> ## Documentation Index
> Fetch the complete documentation index at: https://docs.upflow.io/llms.txt
> Use this file to discover all available pages before exploring further.
# Enabling single sign on (SSO) for your Upflow users
> Deploy SSO for Upflow using OIDC or SAML through identity providers like Microsoft Entra ID so your users sign in with one set of corporate credentials.
**Single Sign On (SSO)** allows users to securely sign on to Upflow and other applications in use at your business with a single set of credentials. Below you'll find a rundown of the process and the steps involved in deploying this authentication method for Upflow.
## OIDC or SAML
OpenID Connect (OIDC) and Security Assertion Markup Language (SAML) are authentication protocols used when configuring SSO. We currently support both these options but we *recommend* OIDC and the guides below describe the OIDC setup process through different Identity Providers.
### Microsoft Entra ID (formerly Azure Active Directory)
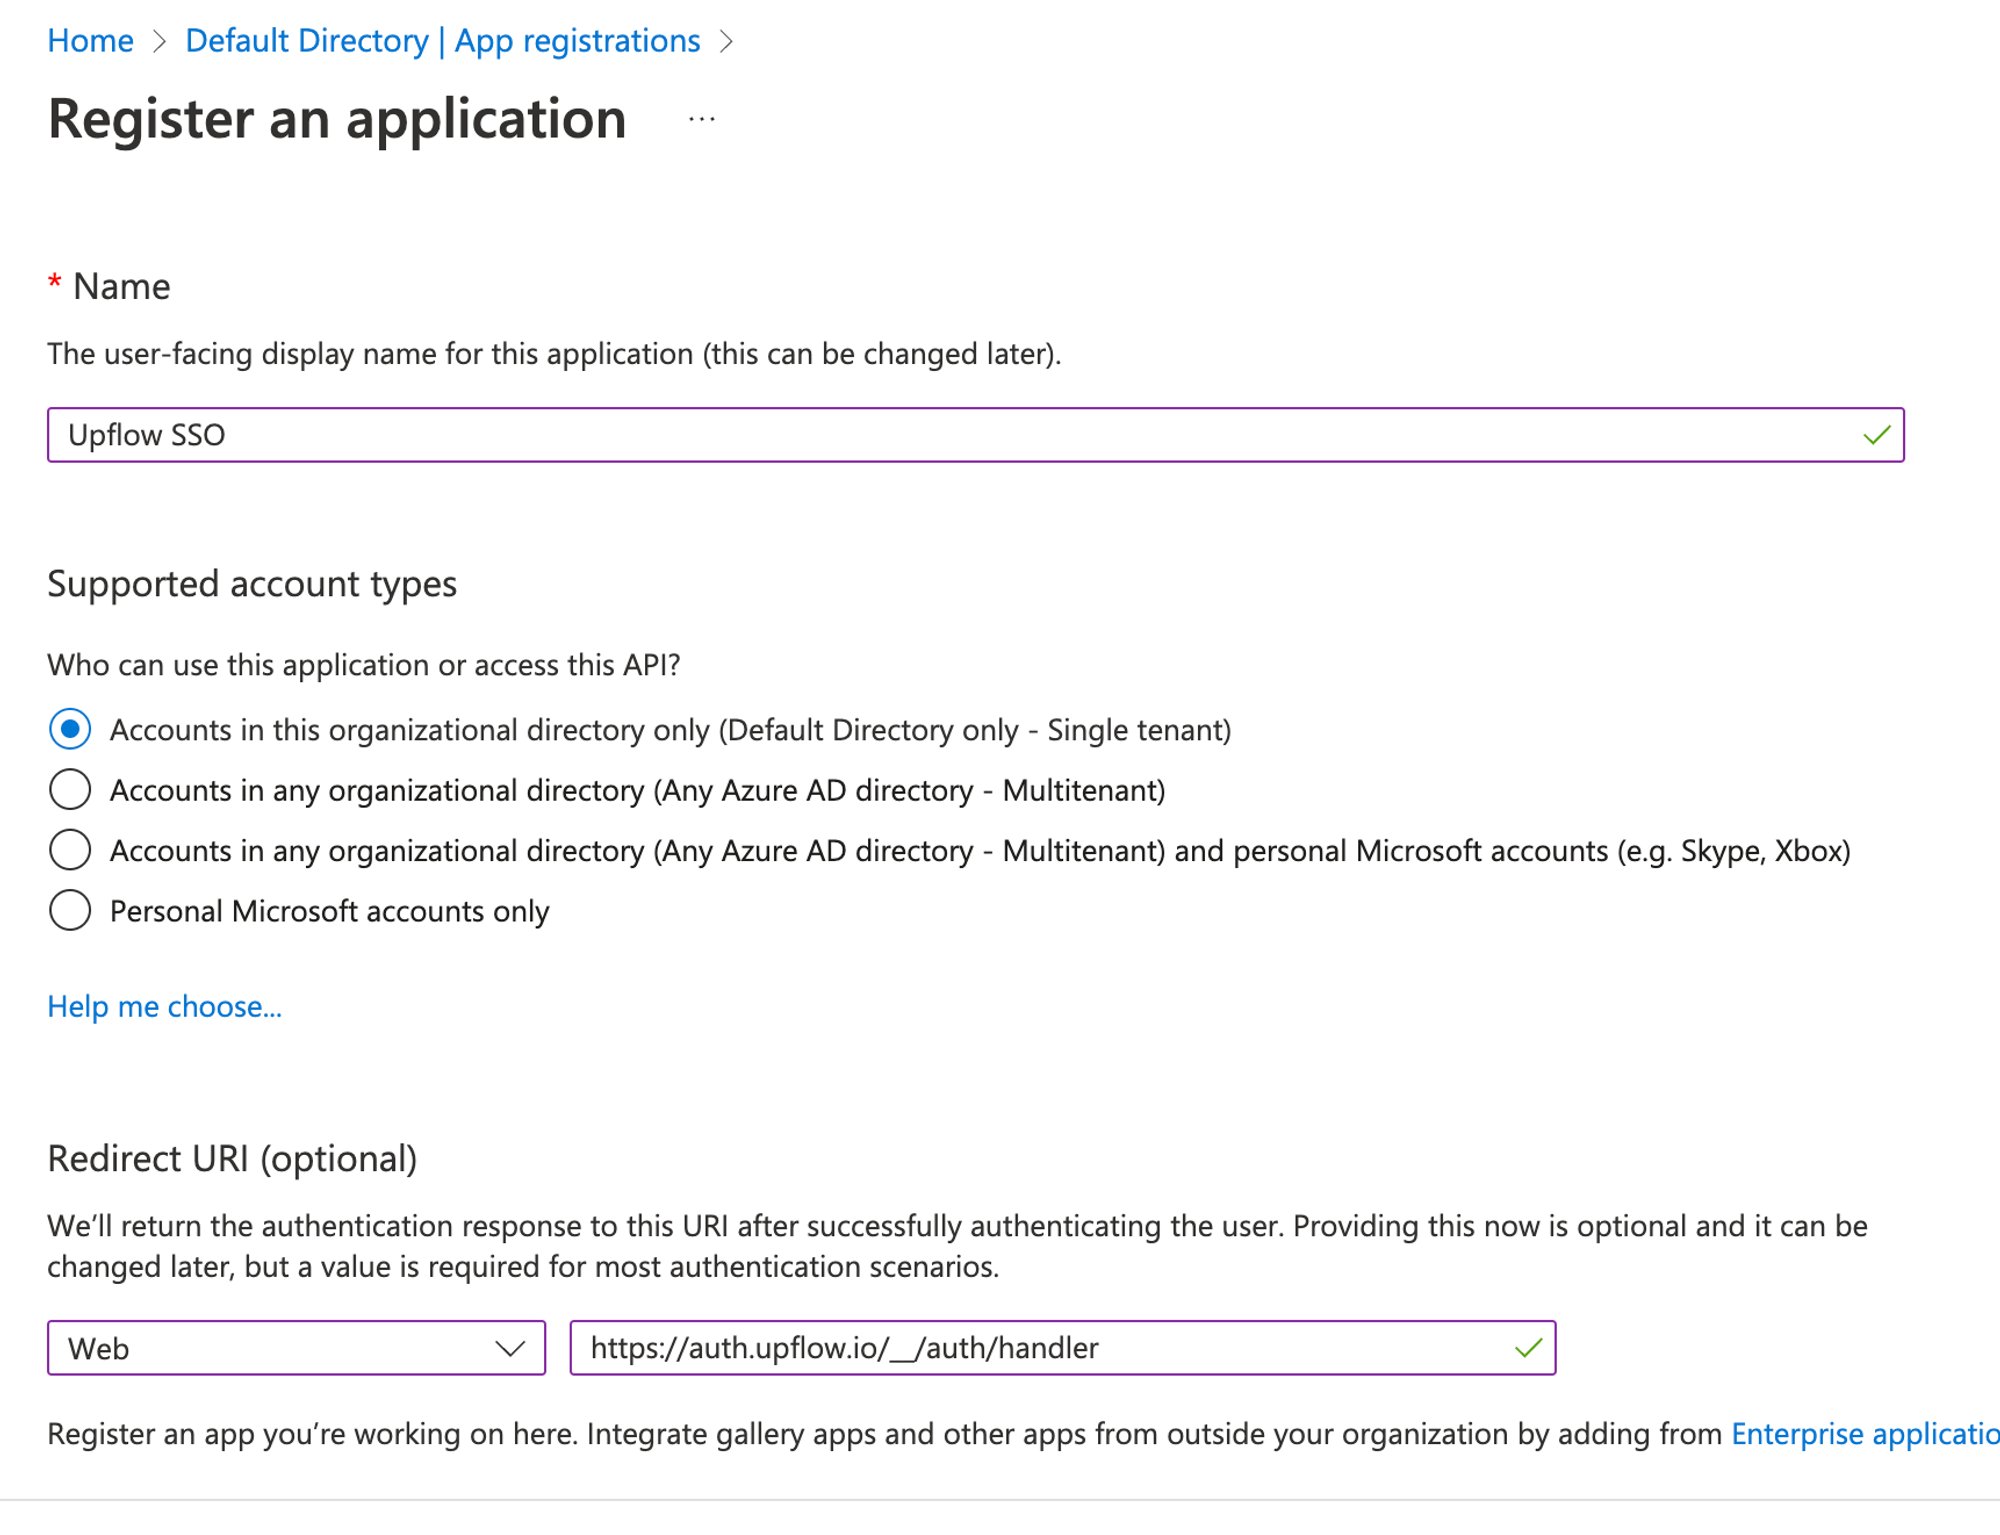
1. Before proceeding, verify that you have an active Microsoft Entra ID account with Admin privileges.
* Name: *Upflow SSO*
* Select: *Single tenant*
* Redirect URI: Select *Web* and enter:
```auto theme={null}
https://auth.upflow.io/__/auth/handler
```
Register Upflow as a new app: *App registration → New registration*
 2. Navigate to the *Upflow SSO* application settings, and create a new app secret: \
*Certificates & secrets* → *New client secret*
* Record the Value field which serves as the `client_secret`\
\
3. Go to *API permissions* and make sure the [*User.Read*](http://User.Read) permission under Microsoft Graph is granted to the application.
2. Navigate to the *Upflow SSO* application settings, and create a new app secret: \
*Certificates & secrets* → *New client secret*
* Record the Value field which serves as the `client_secret`\
\
3. Go to *API permissions* and make sure the [*User.Read*](http://User.Read) permission under Microsoft Graph is granted to the application.
 \
4. Go back to the *Overview* page
1. Record the Application ID which serves as the `client_id`
\
4. Go back to the *Overview* page
1. Record the Application ID which serves as the `client_id`
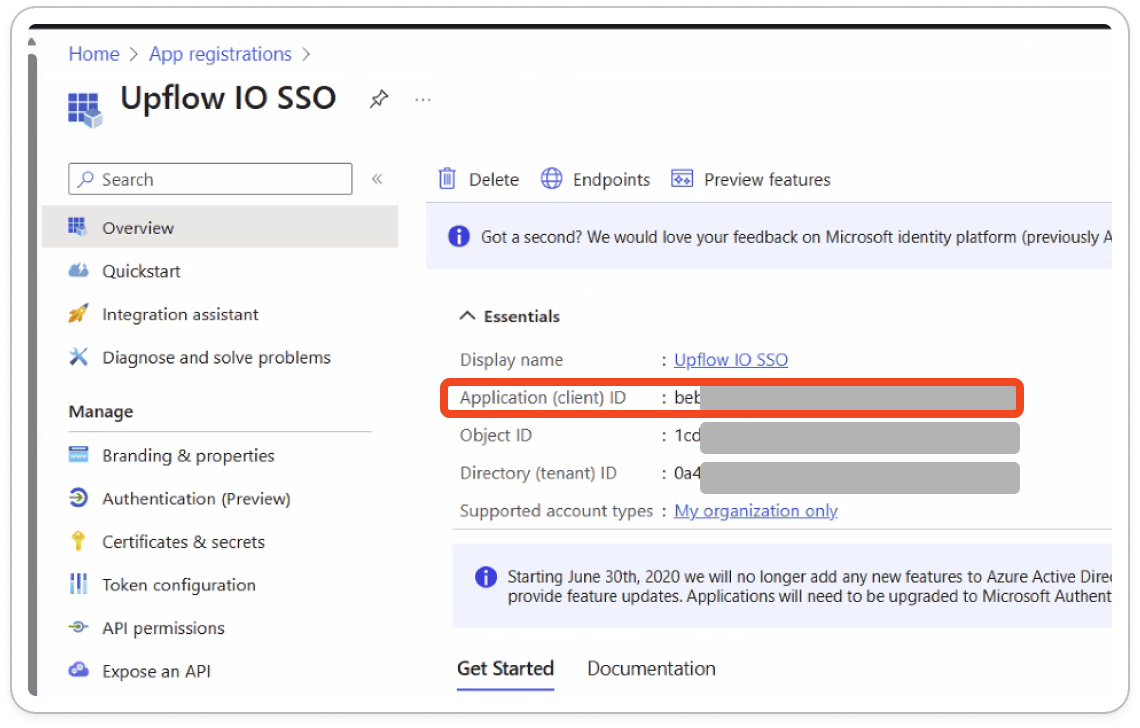 2. Record the Directory (tenant) ID, which can be used to generate the `issuer` URL: [https://login.microsoftonline.com/\[tenant\]/v2.0/](https://login.microsoftonline.com/\[tenant]/v2.0/)
-ID.png?fit=max&auto=format&n=kPGo3bTeqqUpqZZQ&q=85&s=31979ef81a6caed27a98caaef745e56c) Once it is done, open [secrets.upflow.io](https://secrets.upflow.io/) and add the following information to the Editor field to send the following details through and send the link via a Support request at the top of this article:
* Identity Provider
* Application ID (`client_id`)
* Application Secret (`client_secret`)
* Complete `issuer` URL (which will include the Tenant ID)
* `Email domain`
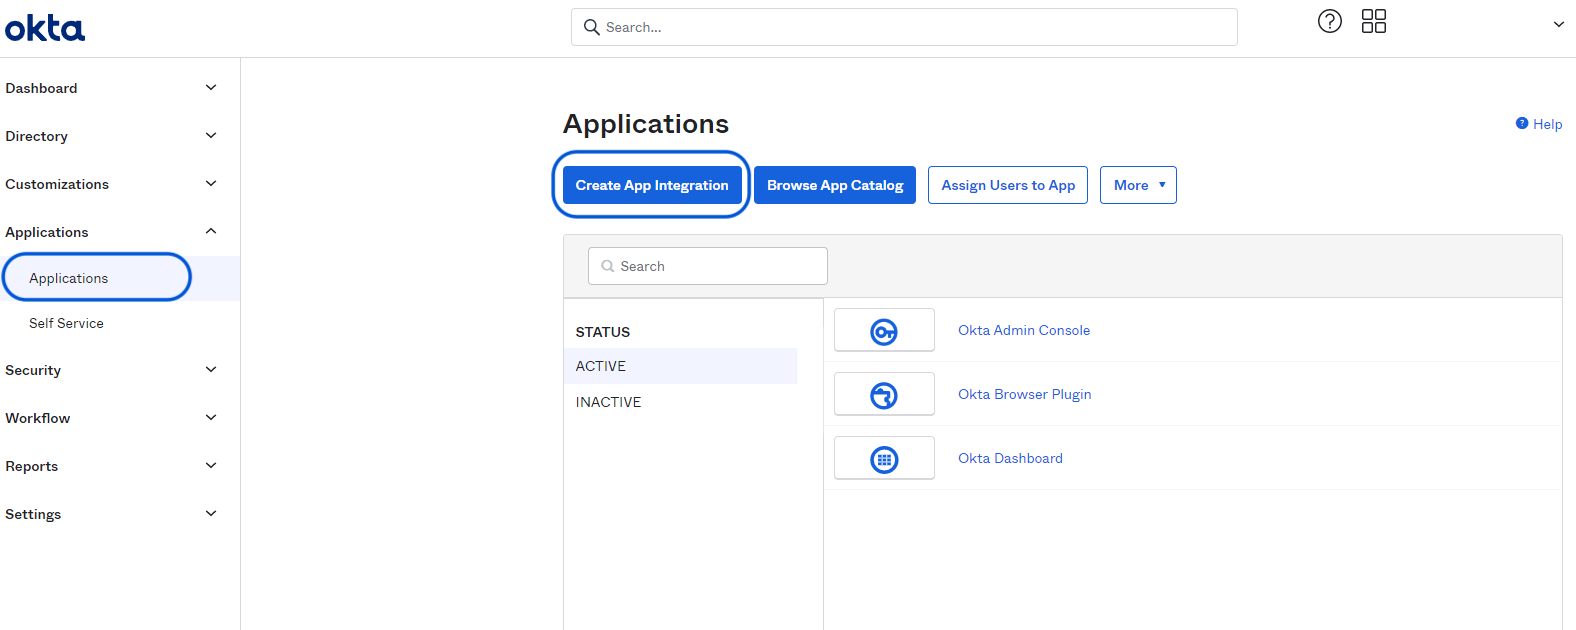
### Okta
1. The Admin user must be signed in to the Okta Admin Console.
2. Once there, go to `Applications` > `Applications` > `Create App Integration`
Once it is done, open [secrets.upflow.io](https://secrets.upflow.io/) and add the following information to the Editor field to send the following details through and send the link via a Support request at the top of this article:
* Identity Provider
* Application ID (`client_id`)
* Application Secret (`client_secret`)
* Complete `issuer` URL (which will include the Tenant ID)
* `Email domain`
### Okta
1. The Admin user must be signed in to the Okta Admin Console.
2. Once there, go to `Applications` > `Applications` > `Create App Integration`
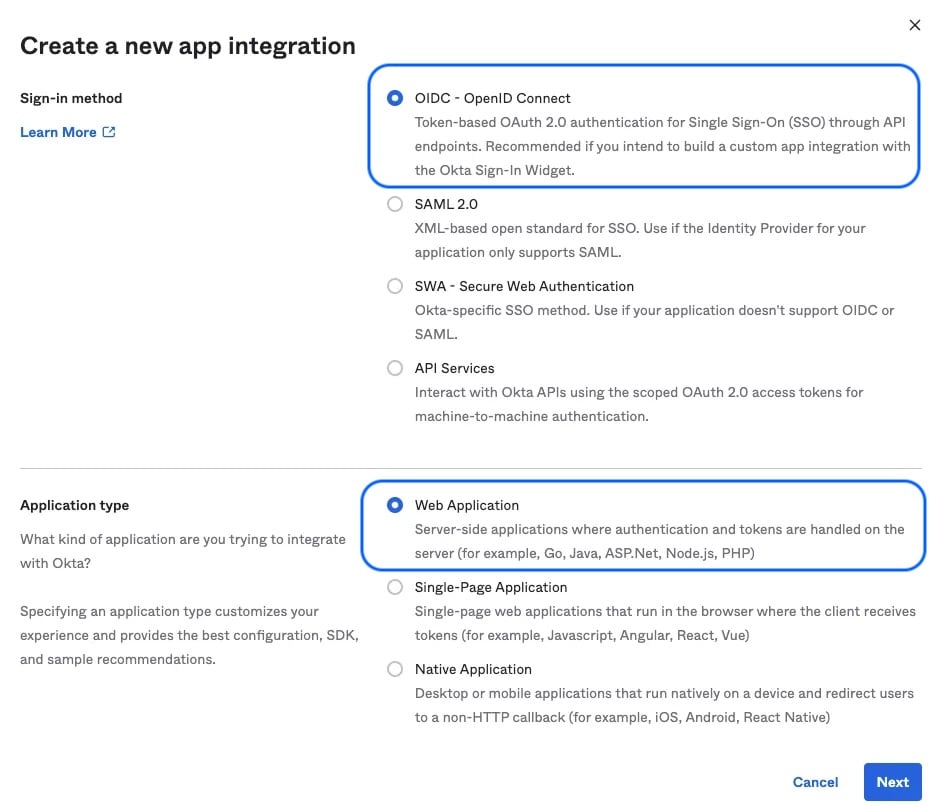
 3. Create a new `App Integration`, then select:
* Sign-in method: *OIDC*
* Application type: *Web Application*
3. Create a new `App Integration`, then select:
* Sign-in method: *OIDC*
* Application type: *Web Application*
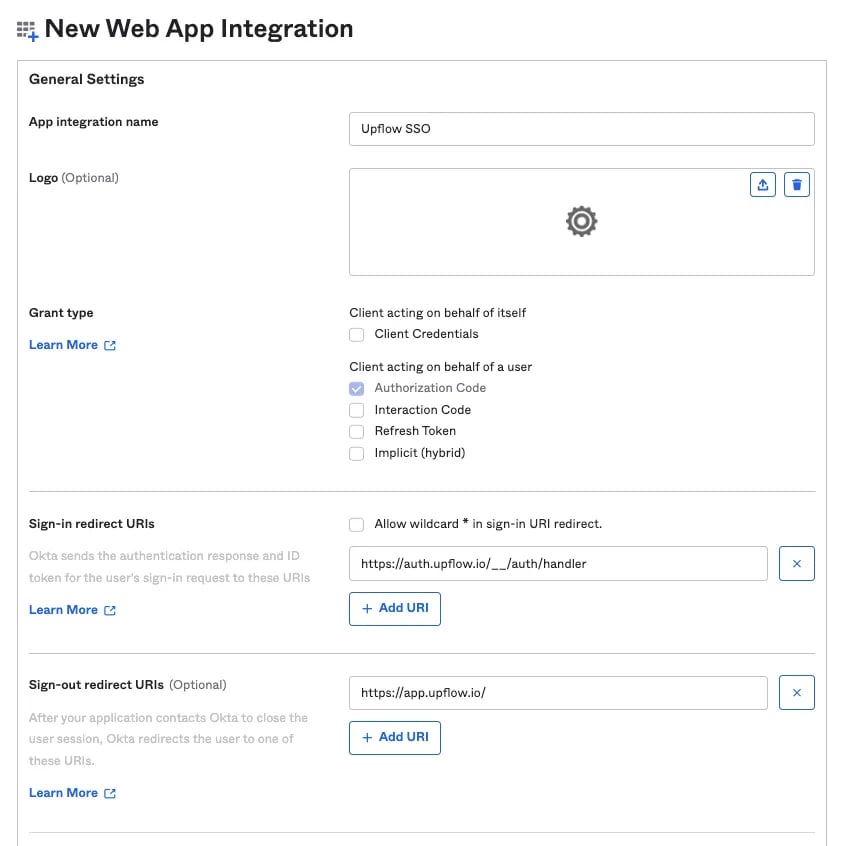
 4. Enter the following settings in the subsequent `New Web App Integration` panel:
* App integration name: *Upflow SSO*
* Grant type: *Authorization Code*
* Sign-in redirect URIs:
```auto theme={null}
https://auth.upflow.io/__/auth/handler
```
* Sign-out redirect URIs:
```auto theme={null}
https://app.upflow.io/
```
4. Enter the following settings in the subsequent `New Web App Integration` panel:
* App integration name: *Upflow SSO*
* Grant type: *Authorization Code*
* Sign-in redirect URIs:
```auto theme={null}
https://auth.upflow.io/__/auth/handler
```
* Sign-out redirect URIs:
```auto theme={null}
https://app.upflow.io/
```
 5. Assignments *(optional)*: The default option lets you assign and grant access to Upflow for everyone in your Okta org.\
\
If you would like to have more fine-grained access control over which users can access the Upflow application, you can select *Controlled access* and identify authorized *group(s)*. As an alternative, groups and users can also be later authorized individually in the application settings page.\
\
**\* Please note that users will still have to be invited in your Upflow account to be able to enter the**
5. Assignments *(optional)*: The default option lets you assign and grant access to Upflow for everyone in your Okta org.\
\
If you would like to have more fine-grained access control over which users can access the Upflow application, you can select *Controlled access* and identify authorized *group(s)*. As an alternative, groups and users can also be later authorized individually in the application settings page.\
\
**\* Please note that users will still have to be invited in your Upflow account to be able to enter the**
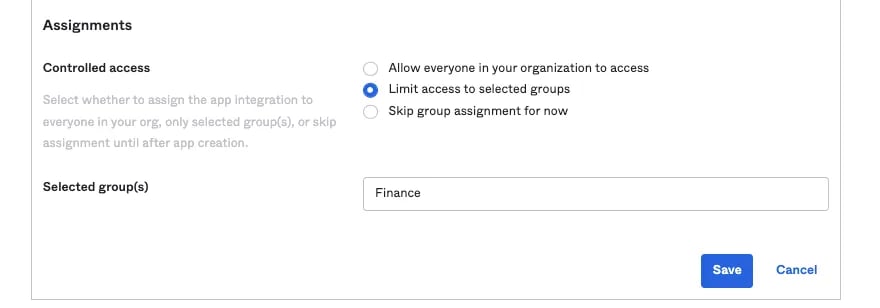 **Upflow application.** 6. After hitting Save, the following application settings panel will display the following parameters which will to be securely transmitted to Upflow:
* the `client_id` (Client ID)
* the `client_secret` (Secret)
**Upflow application.** 6. After hitting Save, the following application settings panel will display the following parameters which will to be securely transmitted to Upflow:
* the `client_id` (Client ID)
* the `client_secret` (Secret)
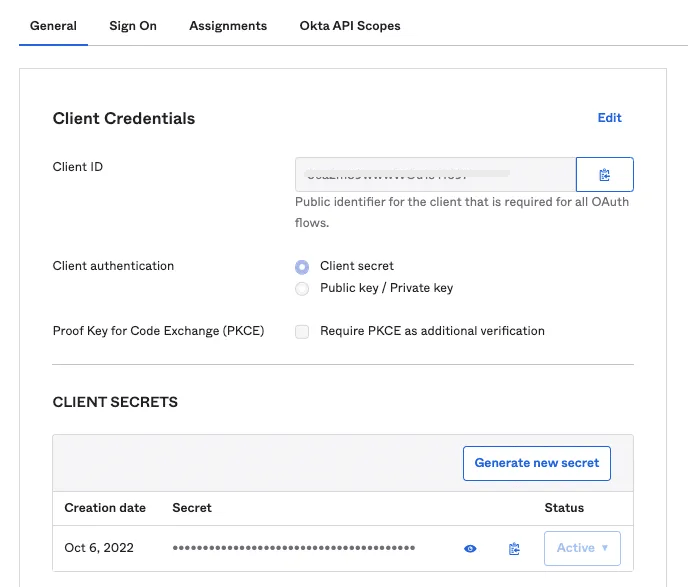 * the `issuer` can be found in the top right corner of the window, right below your email address
Finally, open [secrets.upflow.io](https://secrets.upflow.io) and add the following information to the Editor field to send the following details through. Then send us the link via a Support request at the top of this article:
* `client_id`
* `client_secret`
* Complete `issuer` URL
* `Identity Provider`
* `Email domain`
### SAML
OIDC is our recommended authentication protocol. If you do choose to proceed with SAML, the steps for this process are outlined below:
1. Register a new app on your Identity Provider which will grant access to the Upflow application to read and verify the identity (email) of authenticating users. You'll need the following Redirect URL:
```text theme={null}
https://auth.upflow.io/__/auth/handler
```
2. Finally, open [secrets.upflow.io](https://secrets.upflow.io) and add the following information to the Editor field to send the following details through. Then send us the link via a Support request at the top of this article:
* `idpEntityId`
* `ssoURL`
* `rpEntityId`
* `x509Certificates`
* Email domain name which will be used to sign in (e.g. “[example.com](http://example.com)”)
#### Here's how it should be formatted:
idpEntityId \ ssoURL \ rpEntityId \ x509Certificates \
### FAQ
**Does Upflow support Google SSO?**
* Yes, Upflow offers [Google SSO support](/en-us/technical-documentation/sso/enforce-sign-in-with-google).
**If I set up SSO on my Upflow sandbox account, do I have to do it again on my production account?**
* No, a single SSO configuration can be applied on both accounts. Submit a Support request at the top to ensure the configuration is ported over.
However, if SSO is set up in Production, it won't be ported over the sandbox environment. You'll then have to either:
* Create a new SSO separate project for the sandbox environment
* Regenerate/rotate the secret on the same SSO project you created for your Upflow production environment, and send us the related information, so we can update it on our end. Your team's access to Upflow can therefore be temporarily impacted.
**If SSO is enabled on my Upflow account, can some of our users still sign on with their email and Upflow password?**
* No. Once SSO is enabled on your Upflow account, the activation occurs at the domain level and all users MUST sign in via SSO. All other Upflow authentication methods are disabled.
**Does Upflow support (SCIM) User Provisioning?**
* (SCIM) User Provisioning is not currently supported through Upflow.
**Does Upflow support multi-factor authentication (MFA)?**
* MFA is not currently supported through Upflow.
**Does Upflow support Just-In-Time (JIT) provisioning?**
* Just-In-Time (JIT) provisioning is not currently supported through Upflow.
**Is Upflow able to support an SSO setup with 2 different domains?**
* Yes, please submit a Support request at the top to process this configuration.
* the `issuer` can be found in the top right corner of the window, right below your email address
Finally, open [secrets.upflow.io](https://secrets.upflow.io) and add the following information to the Editor field to send the following details through. Then send us the link via a Support request at the top of this article:
* `client_id`
* `client_secret`
* Complete `issuer` URL
* `Identity Provider`
* `Email domain`
### SAML
OIDC is our recommended authentication protocol. If you do choose to proceed with SAML, the steps for this process are outlined below:
1. Register a new app on your Identity Provider which will grant access to the Upflow application to read and verify the identity (email) of authenticating users. You'll need the following Redirect URL:
```text theme={null}
https://auth.upflow.io/__/auth/handler
```
2. Finally, open [secrets.upflow.io](https://secrets.upflow.io) and add the following information to the Editor field to send the following details through. Then send us the link via a Support request at the top of this article:
* `idpEntityId`
* `ssoURL`
* `rpEntityId`
* `x509Certificates`
* Email domain name which will be used to sign in (e.g. “[example.com](http://example.com)”)
#### Here's how it should be formatted:
idpEntityId \ ssoURL \ rpEntityId \ x509Certificates \
### FAQ
**Does Upflow support Google SSO?**
* Yes, Upflow offers [Google SSO support](/en-us/technical-documentation/sso/enforce-sign-in-with-google).
**If I set up SSO on my Upflow sandbox account, do I have to do it again on my production account?**
* No, a single SSO configuration can be applied on both accounts. Submit a Support request at the top to ensure the configuration is ported over.
However, if SSO is set up in Production, it won't be ported over the sandbox environment. You'll then have to either:
* Create a new SSO separate project for the sandbox environment
* Regenerate/rotate the secret on the same SSO project you created for your Upflow production environment, and send us the related information, so we can update it on our end. Your team's access to Upflow can therefore be temporarily impacted.
**If SSO is enabled on my Upflow account, can some of our users still sign on with their email and Upflow password?**
* No. Once SSO is enabled on your Upflow account, the activation occurs at the domain level and all users MUST sign in via SSO. All other Upflow authentication methods are disabled.
**Does Upflow support (SCIM) User Provisioning?**
* (SCIM) User Provisioning is not currently supported through Upflow.
**Does Upflow support multi-factor authentication (MFA)?**
* MFA is not currently supported through Upflow.
**Does Upflow support Just-In-Time (JIT) provisioning?**
* Just-In-Time (JIT) provisioning is not currently supported through Upflow.
**Is Upflow able to support an SSO setup with 2 different domains?**
* Yes, please submit a Support request at the top to process this configuration.