> ## Documentation Index
> Fetch the complete documentation index at: https://docs.upflow.io/llms.txt
> Use this file to discover all available pages before exploring further.
# Connect ChatGPT to Upflow
> Connect ChatGPT to Upflow via OAuth using a custom MCP connector.
Use this guide to connect ChatGPT to the Upflow MCP server. Once connected, ChatGPT can query data across every Upflow organization you have access to.
## Which path applies to you?
The ChatGPT setup depends on your **ChatGPT plan**:
* **ChatGPT Plus or Pro** — you can enable Developer mode and create a custom app yourself. Follow [Path A: Personal ChatGPT plan](#path-a-personal-chatgpt-plan).
* **ChatGPT Business, Enterprise, or Edu** — your workspace admin must first allow members to create custom MCP connectors. Once they have, you can follow the same steps to create the Upflow app on your account. Follow [Path B: Business, Enterprise, or Edu workspace](#path-b-business-enterprise-or-edu-workspace).
If you're on Business, Enterprise, or Edu and **Developer mode** is greyed out or **Create App** is unavailable, that's expected — your workspace admin needs to enable the permission first. Share the admin step in Path B with them.
ChatGPT Free does not support custom MCP connectors. You'll need at least a Plus, Pro, Business, Enterprise, or Edu plan.
## Path A: Personal ChatGPT plan
For ChatGPT Plus and Pro users.
### Step 1 - Enable Developer mode in ChatGPT
1. In ChatGPT, go to **Settings → Apps**.
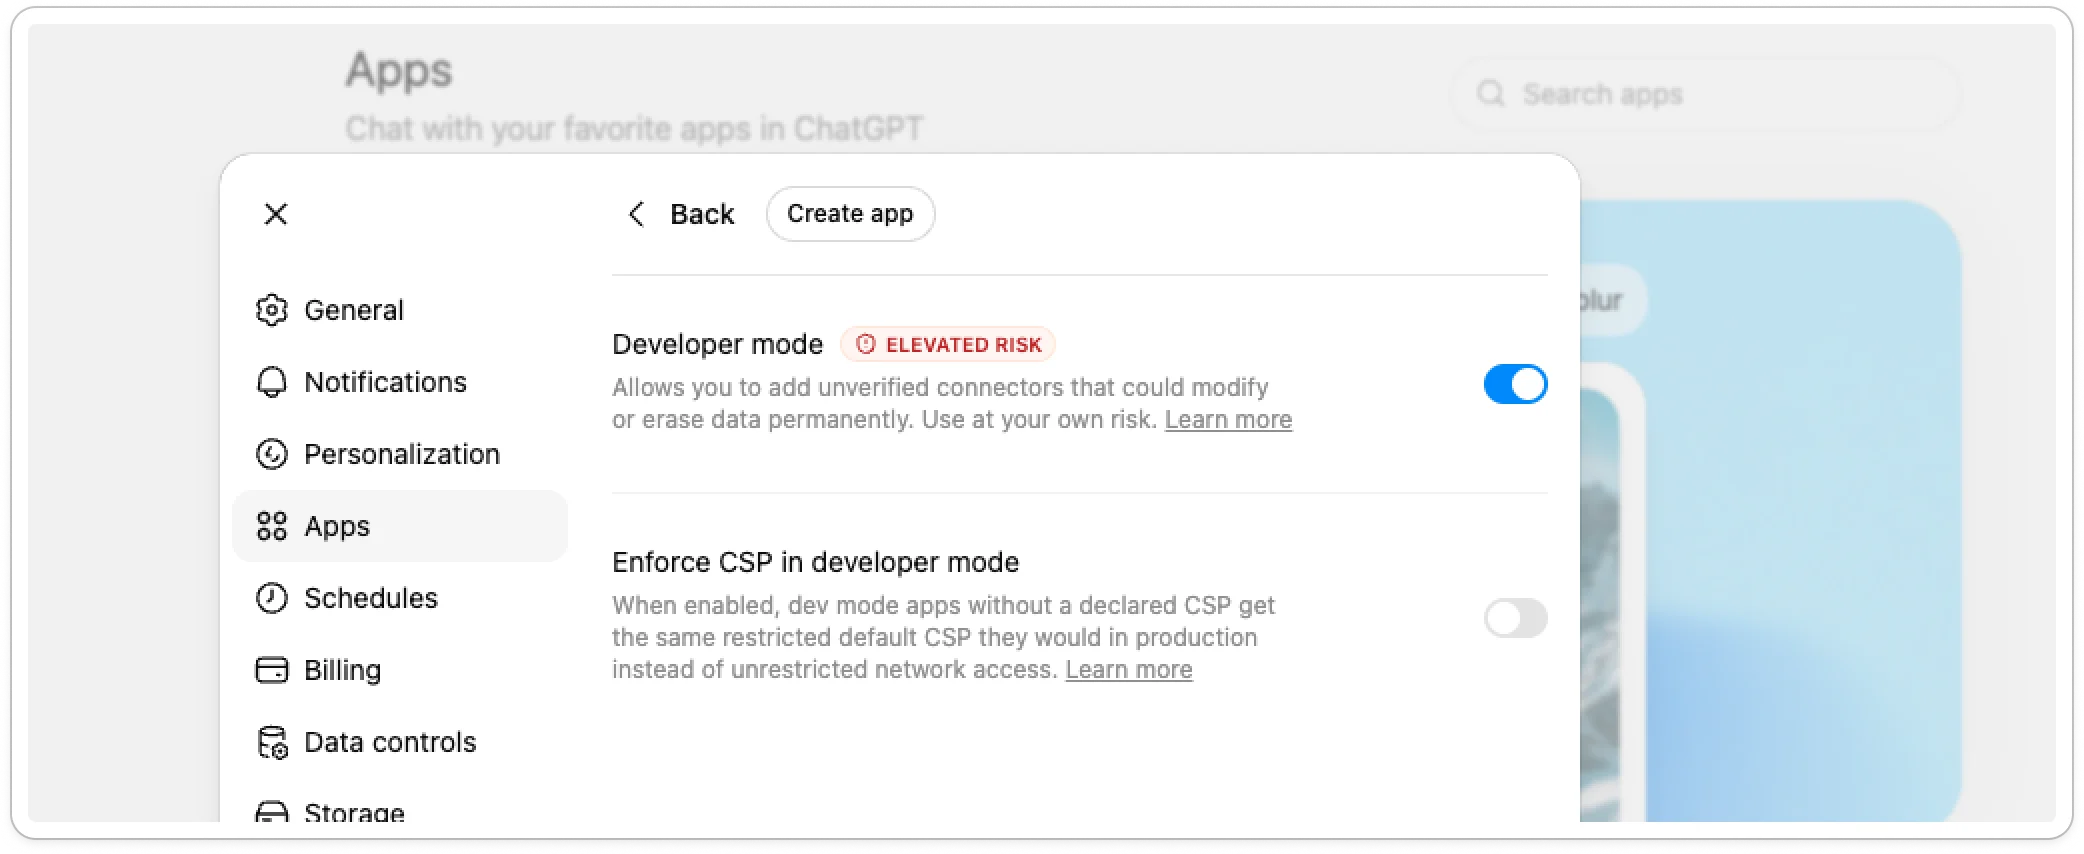
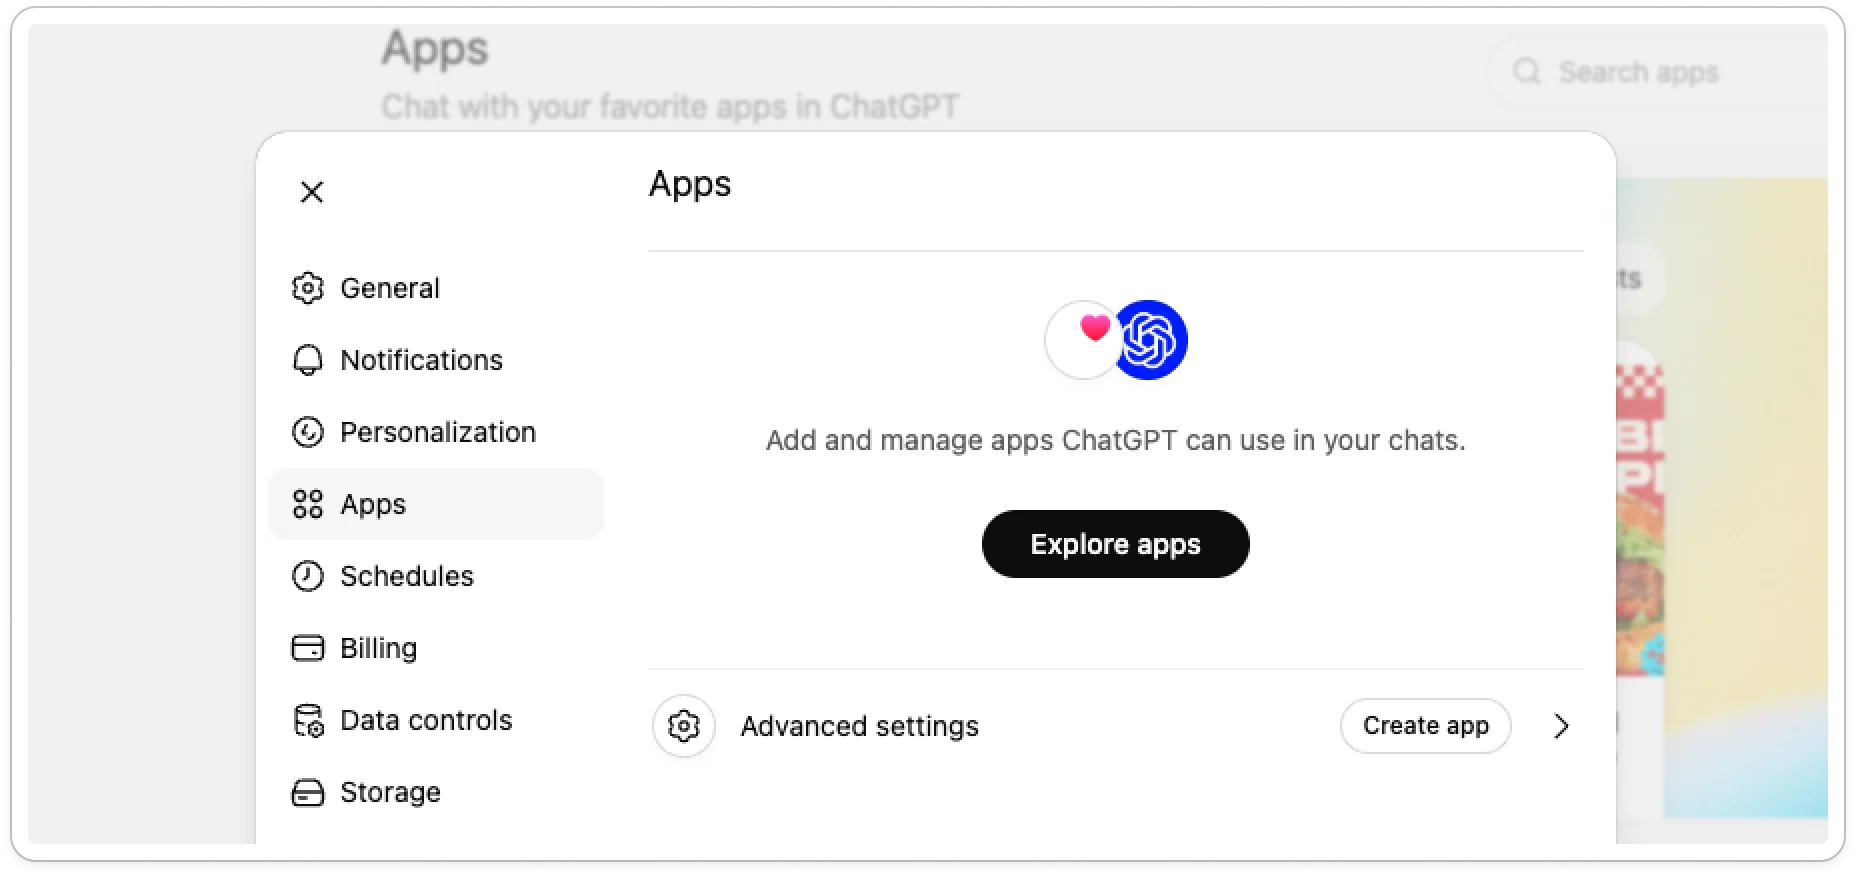 2. Open **Advanced settings** and toggle **Developer mode** on.
3. Click **Create App**.
2. Open **Advanced settings** and toggle **Developer mode** on.
3. Click **Create App**.
 ### Step 2 - Add Upflow as a custom app
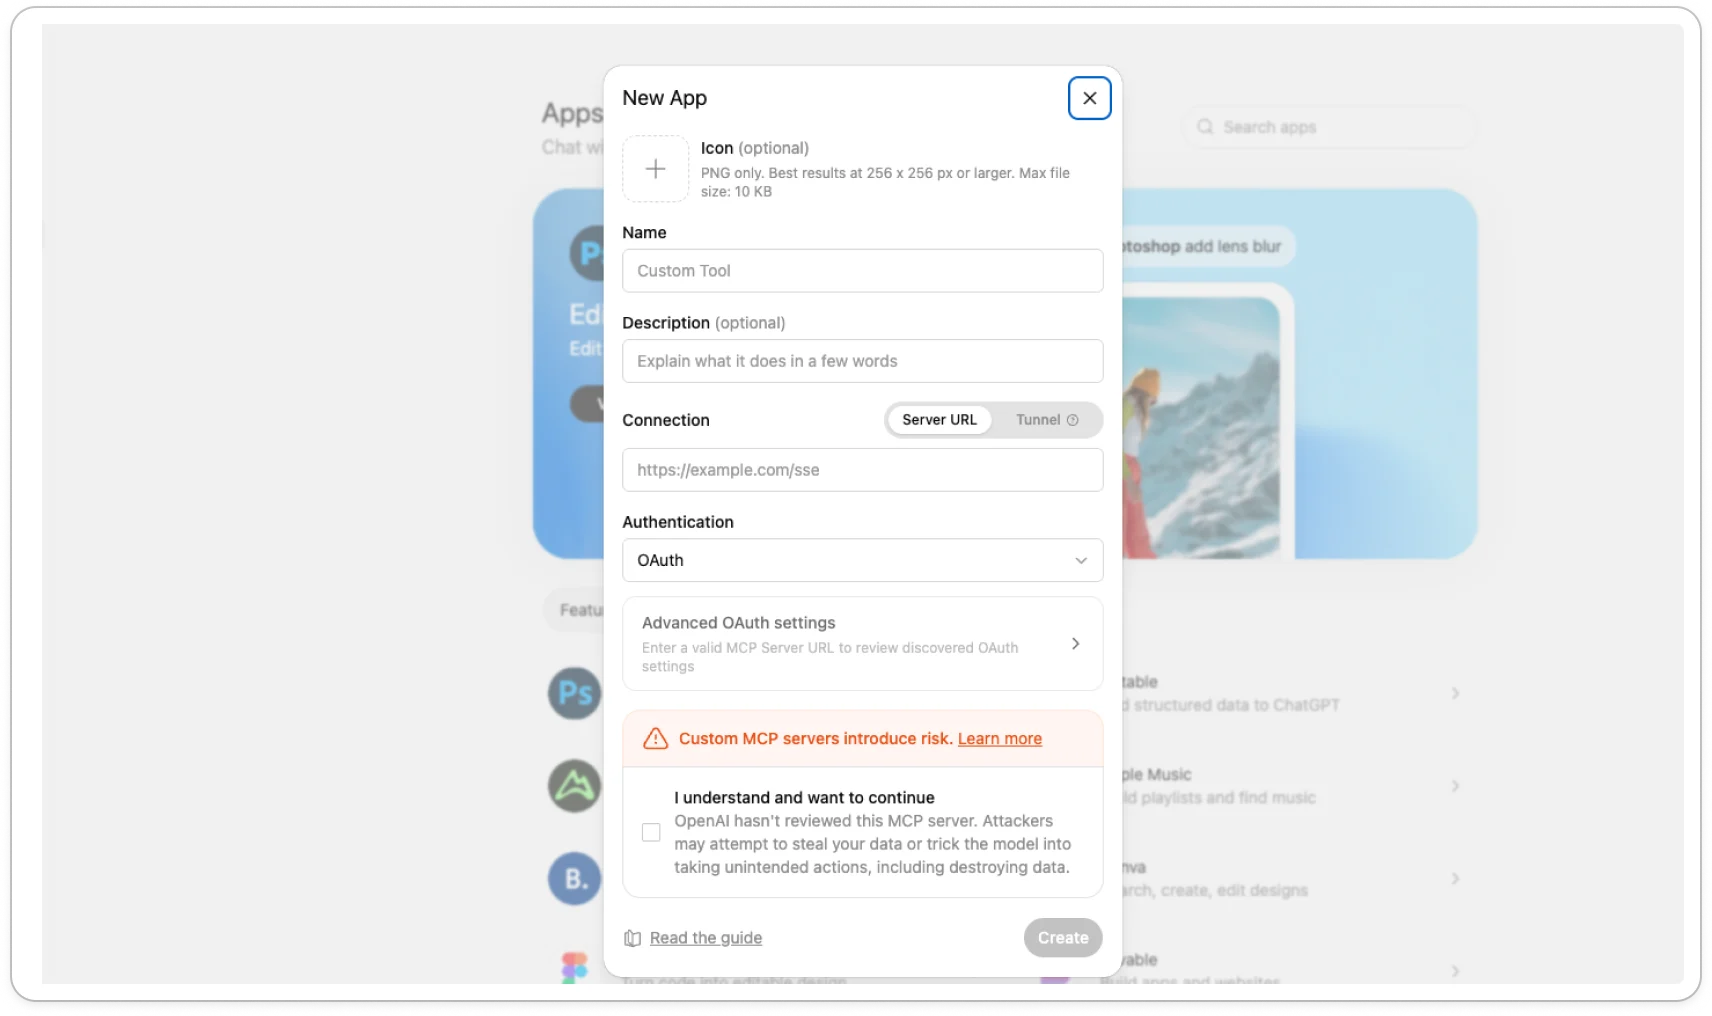
Fill in the form:
* **Name**: `Upflow`
* **URL**: `https://api.upflow.io/mcp`
Tick the **"I understand and I want to continue"** checkbox, then click **Create** then **Sign up with Upflow**.
### Step 2 - Add Upflow as a custom app
Fill in the form:
* **Name**: `Upflow`
* **URL**: `https://api.upflow.io/mcp`
Tick the **"I understand and I want to continue"** checkbox, then click **Create** then **Sign up with Upflow**.
 ### Step 3 - Authorize Upflow
1. If you're not already signed in to Upflow, you'll be prompted to log in.
2. On the consent page, review the access Upflow is granting and click **Authorize**.
3. You'll be redirected back to ChatGPT with the connection confirmed.
### Step 4 - Enable Upflow in your chats
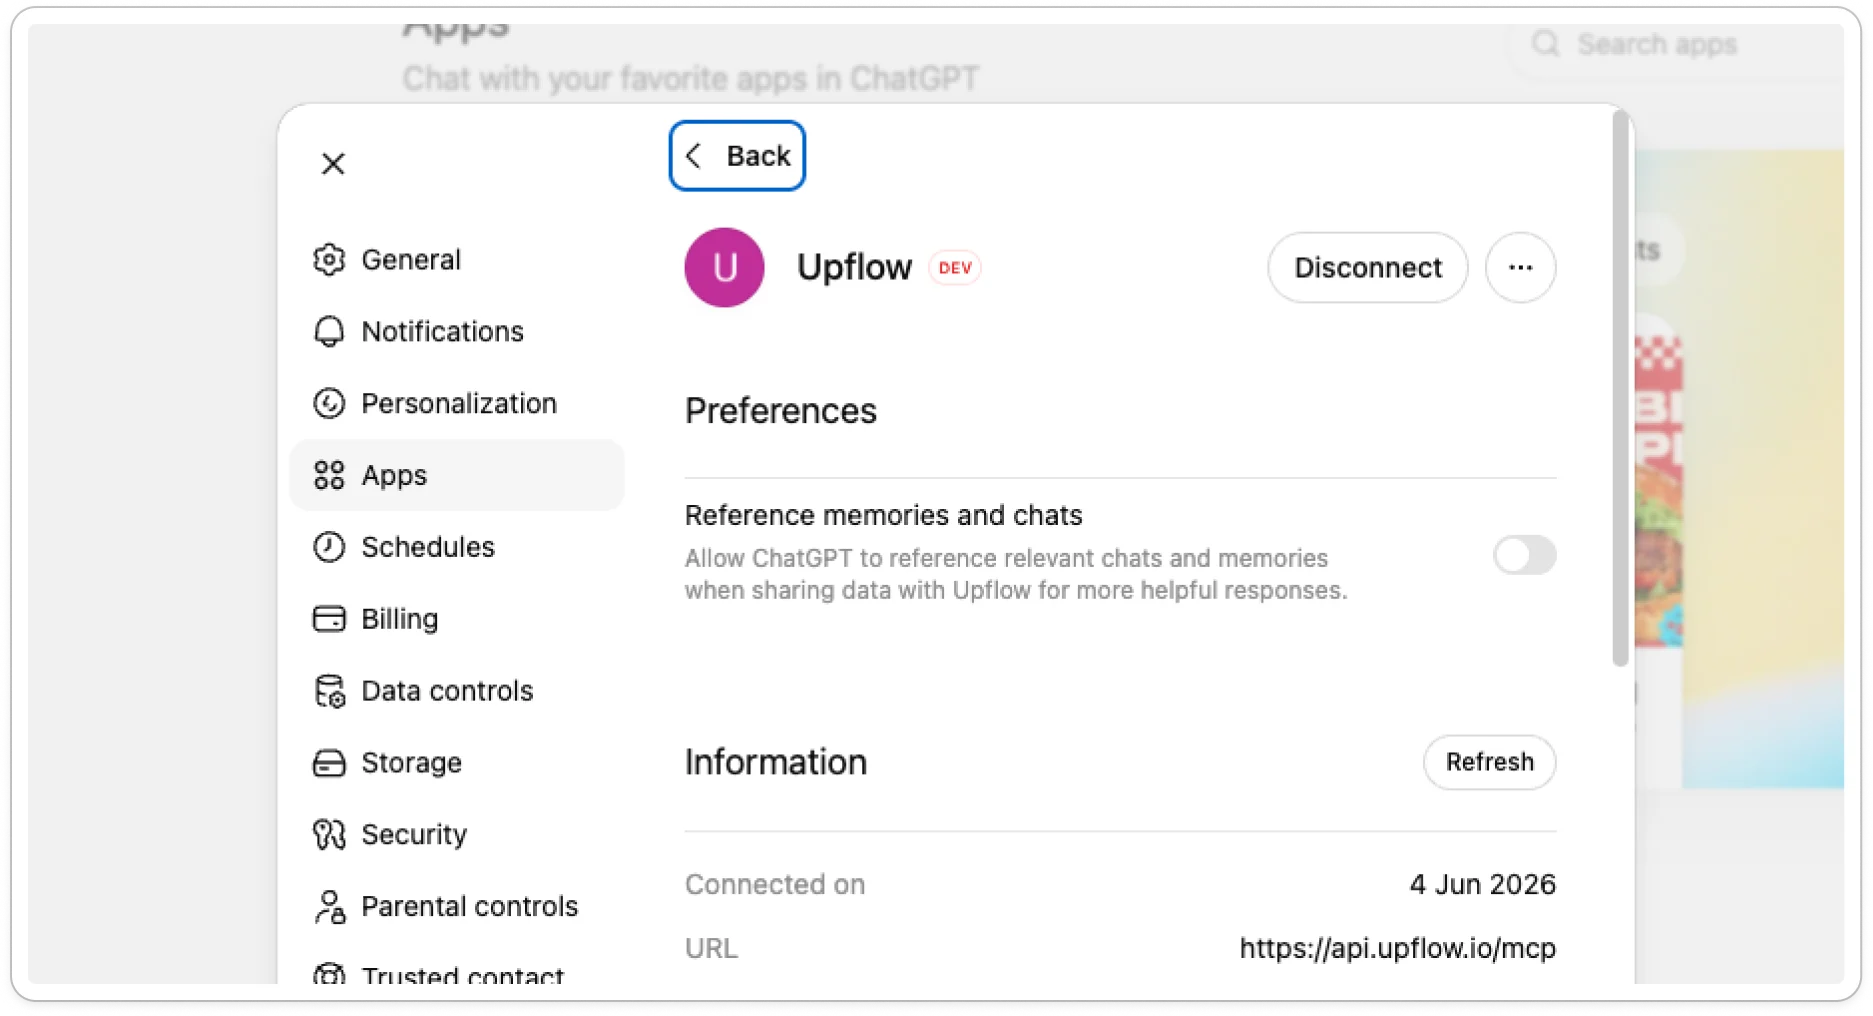
In ChatGPT's app settings for Upflow, toggle on **Reference memories and chats** so ChatGPT can use the connector during conversations.
### Step 3 - Authorize Upflow
1. If you're not already signed in to Upflow, you'll be prompted to log in.
2. On the consent page, review the access Upflow is granting and click **Authorize**.
3. You'll be redirected back to ChatGPT with the connection confirmed.
### Step 4 - Enable Upflow in your chats
In ChatGPT's app settings for Upflow, toggle on **Reference memories and chats** so ChatGPT can use the connector during conversations.
 ## Path B: Business, Enterprise, or Edu workspace
On Business, Enterprise, and Edu workspaces, creating custom MCP connectors is gated by an admin permission. Once the admin enables it, each member follows the same steps as Path A on their own account.
### For the workspace admin
#### Step 1 - Allow members to create custom MCP connectors
1. Go to **Workspace Settings → Permissions & Roles**.
2. Find the **Connected Data** section and enable **Developer mode / Create custom MCP connectors**.
Members of your workspace can now turn on Developer mode in their own ChatGPT settings and create custom apps.
### For each ChatGPT member
Once the admin permission is enabled, follow the same steps as Path A above:
1. [**Enable Developer mode in ChatGPT**](#step-1---enable-developer-mode-in-chatgpt) — Settings → Apps → Advanced settings → Developer mode → Create App.
2. [**Add Upflow as a custom app**](#step-2---add-upflow-as-a-custom-app) — fill in Name and URL, tick the checkbox, click Sign up with Upflow.
3. [**Authorize Upflow**](#step-3---authorize-upflow) — log in if needed, click Authorize on the consent page.
4. [**Enable Upflow in your chats**](#step-4---enable-upflow-in-your-chats) — toggle on Reference memories and chats.
ChatGPT does not share a single workspace-level connector — every member creates their own Upflow app and authorizes their own OAuth grant.
## Try it out
Ask ChatGPT anything about your Upflow data. A few prompts to get started:
* **Top debtors** — *Who are the top 5 debtors by outstanding balance?*
* **Recent collections** — *How much have we collected since the beginning of the month?*
* **Customer contact** — *Who is the main contact for \[customer name]?*
## Manage or disconnect
To see all the AI clients you've connected to Upflow, or to revoke this connection, go to [**Settings → User → MCP access**](https://app.upflow.io/organization/-/settings/user/mcp-access) in the Upflow app. Each connected client can be revoked individually.
## Related articles
* [Connect Upflow to your AI client (overview)](/en-us/technical-documentation/mcp-server/overview)
* [Connect Claude](/en-us/technical-documentation/mcp-server/connect-claude)
## Path B: Business, Enterprise, or Edu workspace
On Business, Enterprise, and Edu workspaces, creating custom MCP connectors is gated by an admin permission. Once the admin enables it, each member follows the same steps as Path A on their own account.
### For the workspace admin
#### Step 1 - Allow members to create custom MCP connectors
1. Go to **Workspace Settings → Permissions & Roles**.
2. Find the **Connected Data** section and enable **Developer mode / Create custom MCP connectors**.
Members of your workspace can now turn on Developer mode in their own ChatGPT settings and create custom apps.
### For each ChatGPT member
Once the admin permission is enabled, follow the same steps as Path A above:
1. [**Enable Developer mode in ChatGPT**](#step-1---enable-developer-mode-in-chatgpt) — Settings → Apps → Advanced settings → Developer mode → Create App.
2. [**Add Upflow as a custom app**](#step-2---add-upflow-as-a-custom-app) — fill in Name and URL, tick the checkbox, click Sign up with Upflow.
3. [**Authorize Upflow**](#step-3---authorize-upflow) — log in if needed, click Authorize on the consent page.
4. [**Enable Upflow in your chats**](#step-4---enable-upflow-in-your-chats) — toggle on Reference memories and chats.
ChatGPT does not share a single workspace-level connector — every member creates their own Upflow app and authorizes their own OAuth grant.
## Try it out
Ask ChatGPT anything about your Upflow data. A few prompts to get started:
* **Top debtors** — *Who are the top 5 debtors by outstanding balance?*
* **Recent collections** — *How much have we collected since the beginning of the month?*
* **Customer contact** — *Who is the main contact for \[customer name]?*
## Manage or disconnect
To see all the AI clients you've connected to Upflow, or to revoke this connection, go to [**Settings → User → MCP access**](https://app.upflow.io/organization/-/settings/user/mcp-access) in the Upflow app. Each connected client can be revoked individually.
## Related articles
* [Connect Upflow to your AI client (overview)](/en-us/technical-documentation/mcp-server/overview)
* [Connect Claude](/en-us/technical-documentation/mcp-server/connect-claude)