> ## Documentation Index
> Fetch the complete documentation index at: https://docs.upflow.io/llms.txt
> Use this file to discover all available pages before exploring further.
# Integrating with the Upflow API
> Build a data pipeline from any billing or accounting source into Upflow using the public API, with guidance on initial historical import and live sync.
## Overview
Upflow offers a robust [public API](https://developer.upflow.io/) that allows you to set up a data pipeline from an accounting source outside of our natively supported integrations.
The following guide will help ensure an optimal initial import of historical data into Upflow and subsequent live synchronization of up to date data.
***
## Data model mapping
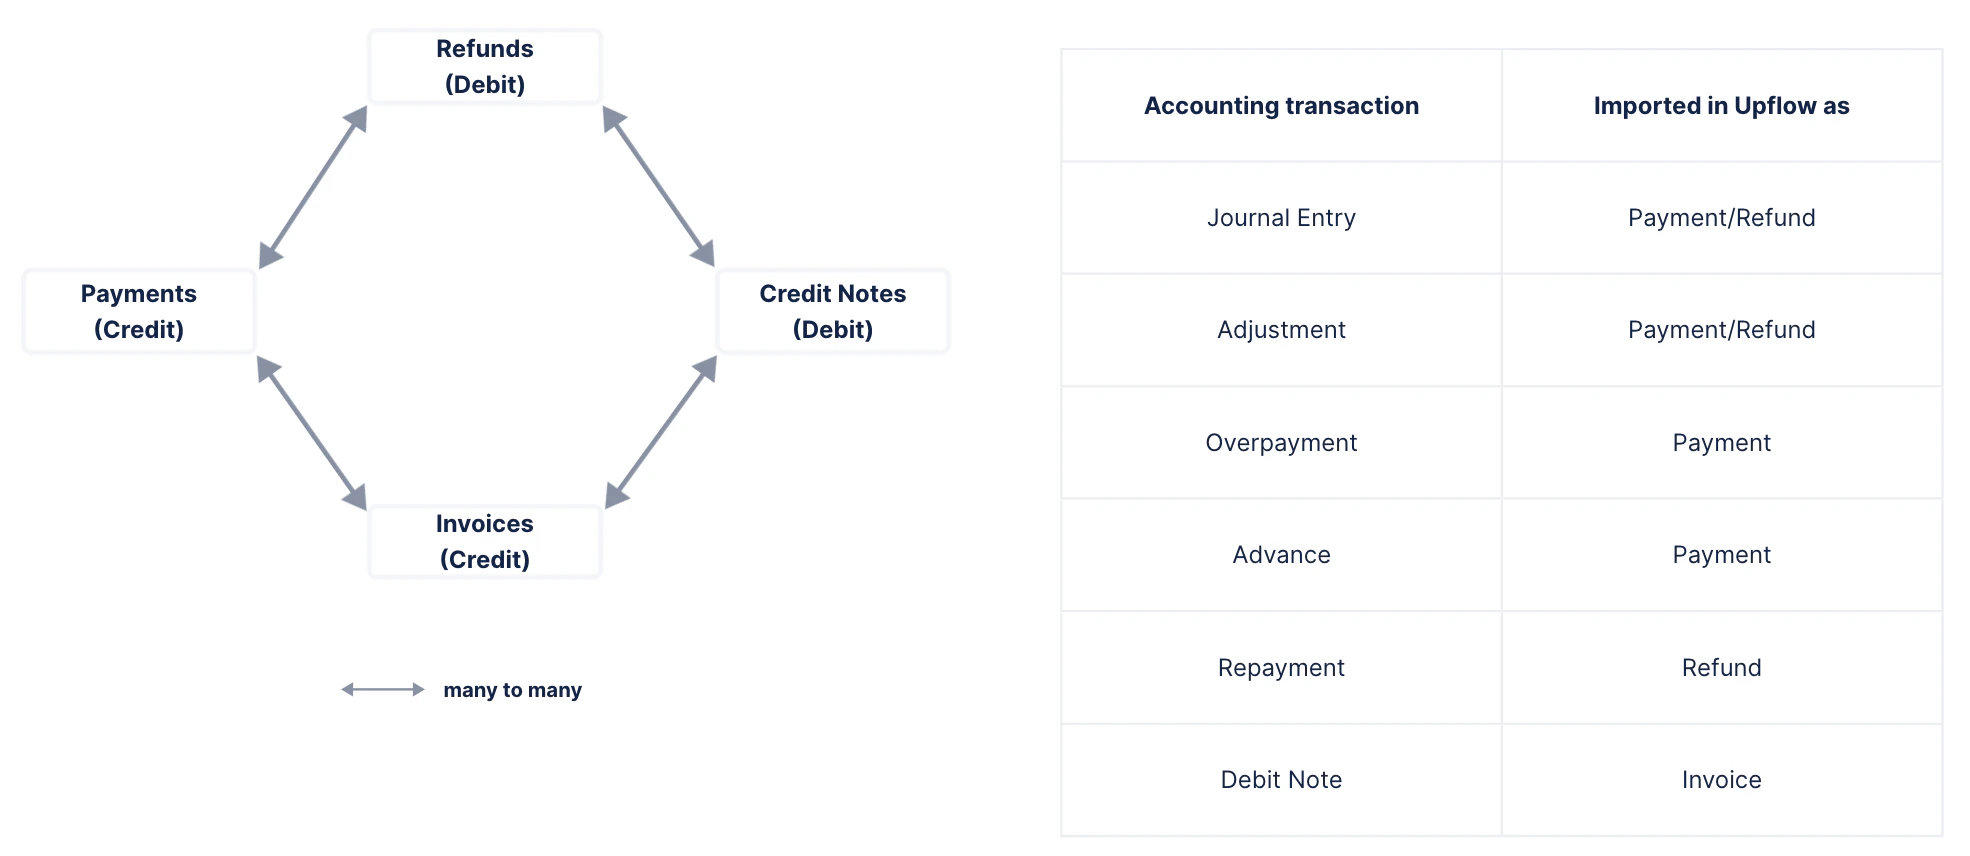
The Upflow data model contains the following entities:
* Customer
* Contact
* Invoice
* Credit Note
* Payment
* Refund
If your model contains entities that affect the customer balance but which are not present on this list (e.g. Adjustments, Journal Entries...) the solution is to map them on a payment or a refund.
 ***
## API Usage
### Sandbox Environment
You can develop and test your integration in our API sandbox: `https://api.sandbox.upflow.io/v1/`
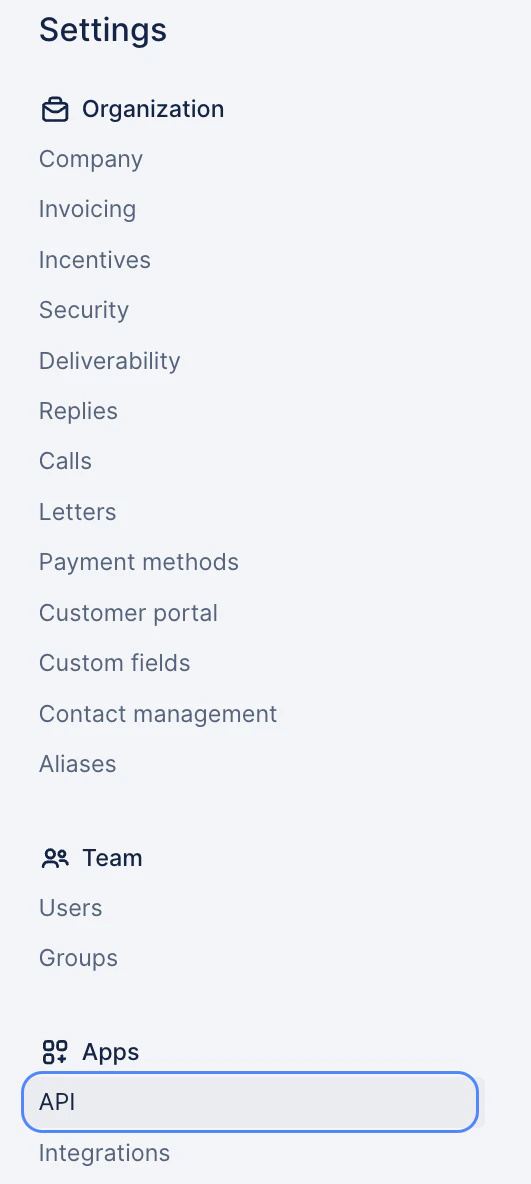
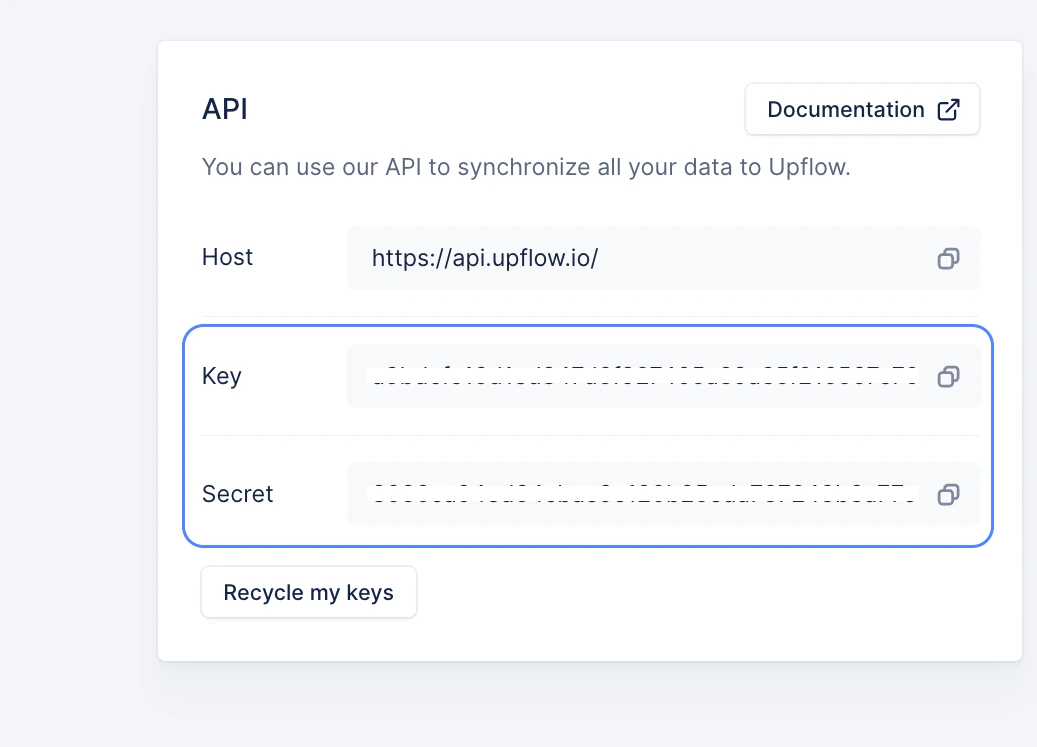
### Authentication
All requests must include the `X-Api-Key` and `X-Api-Secret` authentication headers with each request. These can be obtained by accessing the Settings Menu > API:
***
## API Usage
### Sandbox Environment
You can develop and test your integration in our API sandbox: `https://api.sandbox.upflow.io/v1/`
### Authentication
All requests must include the `X-Api-Key` and `X-Api-Secret` authentication headers with each request. These can be obtained by accessing the Settings Menu > API:
 ### Initial Import
During the initial import, we recommend importing the data sequentially, that is, where you wait for a request to end before making the next one.
* If you want to parallelize the requests to increase the throughput, you should limit the number of concurrent requests to 5.
* Note: API is rate limited to 600 requests per minute and has a concurrency limit of 10.
* For optimal performance, you should avoid importing two entities linked to the same customer at the same time.
### Live synchronization
To implement the live synchronization, you’ll need to detect the changes that are made in the source and apply them in Upflow using the appropriate endpoint.
* Re-importing all the data from the source every day should be avoided as it’s not scalable.
### Reliability recommendation
To ensure consistent reliability in the rare case of the API being down, we recommend to use retry failed request (connection error, 500 or 503) with an exponential backoff (e.g. retry after 1s, 2s, 4s, 8s...).
* You should not retry 40x errors which are not transient, except if you know precisely what you’re doing (e.g. overcome ordering issues).
### Addressing Models using `externalId`
All models contain an `externalId` field which can be used to store your own identifier in Upflow.
* The `externalId` field should always contain the source system entity’s id and it should be unique and immutable.
If you opt for this type of integration, you can prefix ids with `external:` in order to lookup Upflow models using your identifier.
* Examples:
* `GET https://api.upflow.io/v1/customers/12345` returns the customer with `id = 12345`
* `GET https://api.upflow.io/v1/customers/external:12345` returns the customer with `externalId = 12345`
***
## API Functions
### Import
To ease the data import, our API provides a unique endpoint per entity to create or update.
These endpoints will have the following format:
```
POST [https://api.upflow.io/v1/ ](https://api.upflow.io/v1/)
{
"externalId": "...",
...
}
```
The `externalId` field will allow you to detect if the entity has already been imported into Upflow.
If so, the entity will be updated; if not, a new entity will be created.
* Please ensure that your external id's are unique identifiers. Otherwise, entities could be removed accidentally.
### Retrieve
Any entity imported in Upflow can be retrieved with its external id using the following type of endpoint:
```
GET https://api.upflow.io/v1//external:
```
### Delete
In the same way you can retrieve an entity from Upflow, you can also delete an imported entity:
```
DELETE https://api.upflow.io/v1//external:
```
***
## API Endpoints
Basic API documentation on all endpoints can be found [here](https://developer.upflow.io/). Supplemental info pertinent to API integrators found below:
## Import Customer
Refer to the Import Customer endpoint [here](https://developer.upflow.io/#tag/customers/post/customers).
Example:
```
POST https://api.upflow.io/v1/customers
{
"externalId": "1a2c3b",
"name": "Upflow SAS",
"address": {
"address": "25 Passage Dubail",
"zipcode": "75010",
"city": "Paris",
"country": "France"
},
"parent": {
"externalId": "1a2c3c"
},
"contacts": [
{
"firstName": "John",
"lastName": "Doe",
"phone": "+33678059778",
"email": "john@example.com",
"position": "ACCOUNTING",
"externalId": "1a2c3d",
"isMain": true
}
]
}
```
* \*\*Parent-child relation
\*\* \* Upflow supports single level parent-child relationships (a parent customer cannot have a parent). If you have multiple levels of hierarchy, you should link all the child customers to their root ancestor when importing them in Upflow.
```
* A parent-child relationship between two customers should be imported by referencing the parent customer from the child customer. Therefore, the parent customer should be imported before the child customers. Otherwise, a 400 error saying the parent customer does not exist will be returned.
```
* \*\*Contact List
\*\* \* A list of contacts can be provided along with the customer details. \* If the `contacts` field is set, it should always contain the full list of contacts. Otherwise, the previously imported contacts which are not in the list anymore will be removed from Upflow.
```
* If the `contacts` field is not present in the body, the list of contacts will left as it is.
* Note: The contact email is mandatory and must be unique.
```
* \*\*Customer Contact relation
\*\* \* The customer contact relation is a one-to-one relation. This means that a contact cannot be linked to multiple customers at the same time.
```
* However, if you have to assign the same contact to multiple customers, you can do so by providing the same `externalId` for the contact. Upflow will assign each customer’s contact a unique id to maintain unicity.
```
**Notes:**
* You can create customer contacts through this endpoint but the Contact Position (e.g. ACCOUNTING, PAYER, etc) must exist already in your organization.
* To create a new Contact Position, you can do so by accessing your Settings > Contact Management > under Positions > Add.
* For example, if your sandbox's language is English but your production organization's language is French then the same request that succeeds in the sandbox will fail in production since the positions have effectively different names.
* Dunning plans (workflows) cannot be imported OR created via the API. Only existing dunning plans can be linked to customers via API.
* You will **not** be able to create a custom field via the Import Customer endpoint.
## List Customers
Refer to the List Customers endpoint [here](https://developer.upflow.io/#tag/customers/get/customers).
* **Note:** You can filter by custom field values through this endpoint through the following request structure:
/v1/customers?customFieldData\_.eq=
* * Example:
[https://api.sandbox.upflow.io/v1/customers?customFieldsData\_1d234ee4-e6fd-45f1-b97e-2795d03208c1.eq=Huguenel%20Motorbikes%20Inc](https://api.sandbox.upflow.io/v1/customers?customFieldsData_1d234ee4-e6fd-45f1-b97e-2795d03208c1.eq=Huguenel%20Motorbikes%20Inc)
* You can fetch the custom field id through the [List Custom Fields endpoint](https://developer.upflow.io/#tag/custom-fields).
**Pagination:**
* There is a 1000 record per page limit on this endpoint.
# \*\*\*\*
## Delete Customer
Refer to the Delete Customer endpoint [here](https://developer.upflow.io/#tag/customers/delete/customers/%7BcustomerId%7D).
* Only empty customers (no invoice, no payment etc.) should be deleted.
## Import Contacts
There are two ways to import contacts:
1. Import them along with the customer (`customer.contacts` field).
* See Import Customer Section above.
2. Import them separately with the dedicated endpoints.
* Refer to the Create Customer Contacts endpoint [here](https://upflow.docs.apiary.io/reference/0/contacts/create-customer-contact).
* Example:
```
POST https://api.upflow.io/v1/customers/external:123456/contacts
{
"firstName": "John",
"lastName": "Doe",
"phone": "+33678059778",
"email": "john@example.com",
"position": "ACCOUNTING",
"externalId": "1a2b3c",
"isMain": true
}
```
Choose the solution which best fits your needs.
## Import Invoice
Refer to the Import Invoice endpoint [here](https://developer.upflow.io/#tag/invoices/post/invoices).
Example:
```
POST [https://api.upflow.io/v1/invoices ](https://api.upflow.io/v1/invoices)
{
"customId": "INV123456",
"externalId": "54a65b4c32",
"issuedAt": "2015-05-05T12:30:00Z",
"dueDate": "2015-06-05T12:30:00Z",
"currency": "EUR",
"grossAmount": 1700,
"netAmount": 1500,
"customer":
{
"externalId": "1a2c3b"
}
}
```
**Basic operations to** ***Import*** **data from your system ⇒ Upflow :**
* **New invoice** **⇒** [Create / Import Invoice](https://developer.upflow.io/#tag/invoices/post/invoices)
* **Upload the invoice PDF ⇒** [Upload Invoice PDF](https://developer.upflow.io/#tag/invoices/post/invoices/%7BinvoiceId%7D/pdf)
* With multipart/form-data:
To upload invoice PDFs, the recommended solution is to use the multipart/form-data format with the file field containing the file content.
```
* With JSON body:
```
If for some reason, you’re not able to provide the file with the multipart/form-data format, you can also encode the file content in base64 and send it via a JSON field.
```
* See also [How to update an invoice PDF via API](https://support.upflow.io/hc/en-us/articles/25049580498449-How-to-update-an-invoice-PDF-via-API)
```
* **Deletion of an invoice ⇒** [Delete Invoice](https://developer.upflow.io/#tag/invoices/delete/invoices/%7BinvoiceId%7D)
**Basic operations to** ***Retrieve*** **data from Upflow :**
* **Single invoice ⇒** [Get Invoice](https://developer.upflow.io/#tag/invoices/get/invoices/%7BinvoiceId%7D)
* **Multiple invoices ⇒** [List Invoices](https://developer.upflow.io/#tag/invoices/get/invoices)
* **Pagination:** There is a 500 record per page limit on this endpoint.
## Import Payment
Refer to the Import Payment endpoint [here](https://developer.upflow.io/#tag/payments/post/payments).
* The payment must be linked to a customer which can be referenced with its external id:
```
"customer": { "externalId": "12345" }
```
* The payment can be linked to one or several invoices.
* The applied amount must be specified.
```
"linkedInvoices": [
{ "amountLinked": "1000",
"invoice":
{ "externalId": "125643" }
}
]
```
* If the payment is refunded, the link must be specified from the refund object.
* You can also use Payments linked only to a customer to materialize a generic Journal Entry of type "Credit".
Note: If the system you are integrating with allows invoices to be marked as paid without having a linked payment, we recommend generating synthetic transactions so the invoice status in Upflow is paid as well. You can create a payment of the paid invoice amount with a date equal to the invoice issue date. To identify those, you can append the *refNumber* with a "fix:". This skews the analytics but allows the collection to run smoothly.
## Import credit note
Refer to the Import Credit Note endpoint [here](https://developer.upflow.io/#tag/credit-notes/post/credit_notes).
* Like a payment, the credit note must be linked to a customer and, optionally, to one or several invoices.
* Import Credit Note PDF
* Refer to the Import Credit Note PDF import endpoint [here](https://developer.upflow.io/#tag/credit-notes/post/credit_notes/%7BcreditNoteId%7D/pdf).
* The process is the same as for importing invoice PDF's.
## Import Refund
Refer to the Import Refund endpoint [here](https://developer.upflow.io/#tag/refunds/post/refunds).
The refund must be linked to a customer, and optionally to one or several payments or credit notes.
```
"linkedPayments": [
{ "amountLinked": "1000", "payment": { "externalId": "1234" } }
],
"linkedCreditNotes": [
{ "amountLinked": "2000", "creditNote": { "externalId": "4321" } }
],
```
* You can also use Refunds on a customer account to materialize a generic Journal Entry of type "Debit"
## Additional Endpoints:
## Create customer portal URL
Refer to the Create Customer Portal endpoint [here](https://developer.upflow.io/#tag/customers/post/customers/%7BcustomerId%7D/portal) and the dedicated documentation article [here](/en-us/customer-portal/branded-portal/generate-portal-url-via-api).
* This endpoint is used to generate a portal URL for a customer. You can link this URL in your app, or embed it in an iframe to allow your users to access the customer portal from your app. To embed it in an iframe, you must specify the `frameAncestors` attribute in the request.
* The call to retrieve the portal URL must strictly be made from the backend (not the frontend) as it utilises the client’s API secret.
* **Note:** There is no maximum to the `expiresIn` parameter. Our recommendation regarding the timeframe before expiration depends on the usage they need. The lowest is the best for better security because it decreases the risk of someone intercepting the token. So we recommend:
* One day for immediate usage.
* 25 days for cases of longer usage such as including the customer portal URL in an reminder that won't be opened immediately.
## Create custom fields
Refer to the Create Custom Field endpoint [here.](https://developer.upflow.io/#tag/custom-fields/post/custom_fields)
**Notes:**
* For creating/listing custom fields, use [`https://api.upflow.io/v1/custom_field`](https://api.upflow.io/v1/custom_field) API endpoint, GET/POST.
* For linking custom fields to customers, use [`https://api.upflow.io/v1/customer/`](https://api.upflow.io/v1/customer/) or use [`https://api.upflow.io/v1/customer/customerid`](https://api.upflow.io/v1/customer/) endpoint, POST/PUT.
* You will **not** be able to create a custom field via the Import Customer endpoint.
* Payment and Credit Note custom fields can be created through this endpoint using the "entityType": "CREDIT\_NOTE” or “PAYMENT”.
Values must be manually assigned on the UI.
* You can create custom fields with DATATYPE: **SELECT** or **MULTI\_SELECT** through this endpoint.
* The select values need not be specified on this request.
* Example Request Body:
\{ "externalId": "123", "label": "Select Custom Field", "description": "custom field description", "dataType": "SELECT", "entityType": "CUSTOMER" }
* The call should yield a *201 Created* status code when successful.
The custom field should now appear under the Customers entity (or the entity you indicate on the request) in your Settings > Custom Fields page.
* Once the custom field is created, you will be able to use the [Update Customer endpoint](https://developer.upflow.io/#tag/customers/put/customers/%7BcustomerId%7D) to both create the select value *and* assign that select value to the customer at the same time.
* Each time you use the API to input a new select value, a new selectable value is added to the dropdown for that custom field.
* **Important:** Values are case-sensitive so for example "One" and "one" will create two separate select values for the field.
* You can also both create a select value *and* assign that select value to a customer at the same time when creating a customer using the [Import Customer endpoint.](https://developer.upflow.io/#tag/customers/post/customers) (The only difference to the request is that this would be a POST request, the Upflow ID/external Id is omitted from the URL, and *name* & *externalId* of customer is required in the body in addition to the custom field array.)
The formatting for the body of the *PUT: Update Customer* request is shown below:
* For **SELECT** custom field:
\{ "customFields": \[ \{ "id": "12345", "externalId": "678910", "value": \{ "label": "One" } } ] }
(Note: You can exclude either the custom field id *or* external id from the body but not both.)
* For **MULTI\_SELECT** custom field:
\{ "customFields": \[ \{ "id": "12345", "externalId": "678910", "value": \[ \{ "label": "One" }, \{ "label": "Two" }] } ] }
(Note: You can exclude either the custom field id *or* external id from the body but not both.)
## Additional information
### Multi-organization handling
If you work with multiple Upflow organizations, you will need to generate a set of API keys for each organization and scope your synchronization logic to each.
***
If you have any questions/concerns, please submit a Support Request at the top of this article!
### Initial Import
During the initial import, we recommend importing the data sequentially, that is, where you wait for a request to end before making the next one.
* If you want to parallelize the requests to increase the throughput, you should limit the number of concurrent requests to 5.
* Note: API is rate limited to 600 requests per minute and has a concurrency limit of 10.
* For optimal performance, you should avoid importing two entities linked to the same customer at the same time.
### Live synchronization
To implement the live synchronization, you’ll need to detect the changes that are made in the source and apply them in Upflow using the appropriate endpoint.
* Re-importing all the data from the source every day should be avoided as it’s not scalable.
### Reliability recommendation
To ensure consistent reliability in the rare case of the API being down, we recommend to use retry failed request (connection error, 500 or 503) with an exponential backoff (e.g. retry after 1s, 2s, 4s, 8s...).
* You should not retry 40x errors which are not transient, except if you know precisely what you’re doing (e.g. overcome ordering issues).
### Addressing Models using `externalId`
All models contain an `externalId` field which can be used to store your own identifier in Upflow.
* The `externalId` field should always contain the source system entity’s id and it should be unique and immutable.
If you opt for this type of integration, you can prefix ids with `external:` in order to lookup Upflow models using your identifier.
* Examples:
* `GET https://api.upflow.io/v1/customers/12345` returns the customer with `id = 12345`
* `GET https://api.upflow.io/v1/customers/external:12345` returns the customer with `externalId = 12345`
***
## API Functions
### Import
To ease the data import, our API provides a unique endpoint per entity to create or update.
These endpoints will have the following format:
```
POST [https://api.upflow.io/v1/ ](https://api.upflow.io/v1/)
{
"externalId": "...",
...
}
```
The `externalId` field will allow you to detect if the entity has already been imported into Upflow.
If so, the entity will be updated; if not, a new entity will be created.
* Please ensure that your external id's are unique identifiers. Otherwise, entities could be removed accidentally.
### Retrieve
Any entity imported in Upflow can be retrieved with its external id using the following type of endpoint:
```
GET https://api.upflow.io/v1//external:
```
### Delete
In the same way you can retrieve an entity from Upflow, you can also delete an imported entity:
```
DELETE https://api.upflow.io/v1//external:
```
***
## API Endpoints
Basic API documentation on all endpoints can be found [here](https://developer.upflow.io/). Supplemental info pertinent to API integrators found below:
## Import Customer
Refer to the Import Customer endpoint [here](https://developer.upflow.io/#tag/customers/post/customers).
Example:
```
POST https://api.upflow.io/v1/customers
{
"externalId": "1a2c3b",
"name": "Upflow SAS",
"address": {
"address": "25 Passage Dubail",
"zipcode": "75010",
"city": "Paris",
"country": "France"
},
"parent": {
"externalId": "1a2c3c"
},
"contacts": [
{
"firstName": "John",
"lastName": "Doe",
"phone": "+33678059778",
"email": "john@example.com",
"position": "ACCOUNTING",
"externalId": "1a2c3d",
"isMain": true
}
]
}
```
* \*\*Parent-child relation
\*\* \* Upflow supports single level parent-child relationships (a parent customer cannot have a parent). If you have multiple levels of hierarchy, you should link all the child customers to their root ancestor when importing them in Upflow.
```
* A parent-child relationship between two customers should be imported by referencing the parent customer from the child customer. Therefore, the parent customer should be imported before the child customers. Otherwise, a 400 error saying the parent customer does not exist will be returned.
```
* \*\*Contact List
\*\* \* A list of contacts can be provided along with the customer details. \* If the `contacts` field is set, it should always contain the full list of contacts. Otherwise, the previously imported contacts which are not in the list anymore will be removed from Upflow.
```
* If the `contacts` field is not present in the body, the list of contacts will left as it is.
* Note: The contact email is mandatory and must be unique.
```
* \*\*Customer Contact relation
\*\* \* The customer contact relation is a one-to-one relation. This means that a contact cannot be linked to multiple customers at the same time.
```
* However, if you have to assign the same contact to multiple customers, you can do so by providing the same `externalId` for the contact. Upflow will assign each customer’s contact a unique id to maintain unicity.
```
**Notes:**
* You can create customer contacts through this endpoint but the Contact Position (e.g. ACCOUNTING, PAYER, etc) must exist already in your organization.
* To create a new Contact Position, you can do so by accessing your Settings > Contact Management > under Positions > Add.
* For example, if your sandbox's language is English but your production organization's language is French then the same request that succeeds in the sandbox will fail in production since the positions have effectively different names.
* Dunning plans (workflows) cannot be imported OR created via the API. Only existing dunning plans can be linked to customers via API.
* You will **not** be able to create a custom field via the Import Customer endpoint.
## List Customers
Refer to the List Customers endpoint [here](https://developer.upflow.io/#tag/customers/get/customers).
* **Note:** You can filter by custom field values through this endpoint through the following request structure:
/v1/customers?customFieldData\_.eq=
* * Example:
[https://api.sandbox.upflow.io/v1/customers?customFieldsData\_1d234ee4-e6fd-45f1-b97e-2795d03208c1.eq=Huguenel%20Motorbikes%20Inc](https://api.sandbox.upflow.io/v1/customers?customFieldsData_1d234ee4-e6fd-45f1-b97e-2795d03208c1.eq=Huguenel%20Motorbikes%20Inc)
* You can fetch the custom field id through the [List Custom Fields endpoint](https://developer.upflow.io/#tag/custom-fields).
**Pagination:**
* There is a 1000 record per page limit on this endpoint.
# \*\*\*\*
## Delete Customer
Refer to the Delete Customer endpoint [here](https://developer.upflow.io/#tag/customers/delete/customers/%7BcustomerId%7D).
* Only empty customers (no invoice, no payment etc.) should be deleted.
## Import Contacts
There are two ways to import contacts:
1. Import them along with the customer (`customer.contacts` field).
* See Import Customer Section above.
2. Import them separately with the dedicated endpoints.
* Refer to the Create Customer Contacts endpoint [here](https://upflow.docs.apiary.io/reference/0/contacts/create-customer-contact).
* Example:
```
POST https://api.upflow.io/v1/customers/external:123456/contacts
{
"firstName": "John",
"lastName": "Doe",
"phone": "+33678059778",
"email": "john@example.com",
"position": "ACCOUNTING",
"externalId": "1a2b3c",
"isMain": true
}
```
Choose the solution which best fits your needs.
## Import Invoice
Refer to the Import Invoice endpoint [here](https://developer.upflow.io/#tag/invoices/post/invoices).
Example:
```
POST [https://api.upflow.io/v1/invoices ](https://api.upflow.io/v1/invoices)
{
"customId": "INV123456",
"externalId": "54a65b4c32",
"issuedAt": "2015-05-05T12:30:00Z",
"dueDate": "2015-06-05T12:30:00Z",
"currency": "EUR",
"grossAmount": 1700,
"netAmount": 1500,
"customer":
{
"externalId": "1a2c3b"
}
}
```
**Basic operations to** ***Import*** **data from your system ⇒ Upflow :**
* **New invoice** **⇒** [Create / Import Invoice](https://developer.upflow.io/#tag/invoices/post/invoices)
* **Upload the invoice PDF ⇒** [Upload Invoice PDF](https://developer.upflow.io/#tag/invoices/post/invoices/%7BinvoiceId%7D/pdf)
* With multipart/form-data:
To upload invoice PDFs, the recommended solution is to use the multipart/form-data format with the file field containing the file content.
```
* With JSON body:
```
If for some reason, you’re not able to provide the file with the multipart/form-data format, you can also encode the file content in base64 and send it via a JSON field.
```
* See also [How to update an invoice PDF via API](https://support.upflow.io/hc/en-us/articles/25049580498449-How-to-update-an-invoice-PDF-via-API)
```
* **Deletion of an invoice ⇒** [Delete Invoice](https://developer.upflow.io/#tag/invoices/delete/invoices/%7BinvoiceId%7D)
**Basic operations to** ***Retrieve*** **data from Upflow :**
* **Single invoice ⇒** [Get Invoice](https://developer.upflow.io/#tag/invoices/get/invoices/%7BinvoiceId%7D)
* **Multiple invoices ⇒** [List Invoices](https://developer.upflow.io/#tag/invoices/get/invoices)
* **Pagination:** There is a 500 record per page limit on this endpoint.
## Import Payment
Refer to the Import Payment endpoint [here](https://developer.upflow.io/#tag/payments/post/payments).
* The payment must be linked to a customer which can be referenced with its external id:
```
"customer": { "externalId": "12345" }
```
* The payment can be linked to one or several invoices.
* The applied amount must be specified.
```
"linkedInvoices": [
{ "amountLinked": "1000",
"invoice":
{ "externalId": "125643" }
}
]
```
* If the payment is refunded, the link must be specified from the refund object.
* You can also use Payments linked only to a customer to materialize a generic Journal Entry of type "Credit".
Note: If the system you are integrating with allows invoices to be marked as paid without having a linked payment, we recommend generating synthetic transactions so the invoice status in Upflow is paid as well. You can create a payment of the paid invoice amount with a date equal to the invoice issue date. To identify those, you can append the *refNumber* with a "fix:". This skews the analytics but allows the collection to run smoothly.
## Import credit note
Refer to the Import Credit Note endpoint [here](https://developer.upflow.io/#tag/credit-notes/post/credit_notes).
* Like a payment, the credit note must be linked to a customer and, optionally, to one or several invoices.
* Import Credit Note PDF
* Refer to the Import Credit Note PDF import endpoint [here](https://developer.upflow.io/#tag/credit-notes/post/credit_notes/%7BcreditNoteId%7D/pdf).
* The process is the same as for importing invoice PDF's.
## Import Refund
Refer to the Import Refund endpoint [here](https://developer.upflow.io/#tag/refunds/post/refunds).
The refund must be linked to a customer, and optionally to one or several payments or credit notes.
```
"linkedPayments": [
{ "amountLinked": "1000", "payment": { "externalId": "1234" } }
],
"linkedCreditNotes": [
{ "amountLinked": "2000", "creditNote": { "externalId": "4321" } }
],
```
* You can also use Refunds on a customer account to materialize a generic Journal Entry of type "Debit"
## Additional Endpoints:
## Create customer portal URL
Refer to the Create Customer Portal endpoint [here](https://developer.upflow.io/#tag/customers/post/customers/%7BcustomerId%7D/portal) and the dedicated documentation article [here](/en-us/customer-portal/branded-portal/generate-portal-url-via-api).
* This endpoint is used to generate a portal URL for a customer. You can link this URL in your app, or embed it in an iframe to allow your users to access the customer portal from your app. To embed it in an iframe, you must specify the `frameAncestors` attribute in the request.
* The call to retrieve the portal URL must strictly be made from the backend (not the frontend) as it utilises the client’s API secret.
* **Note:** There is no maximum to the `expiresIn` parameter. Our recommendation regarding the timeframe before expiration depends on the usage they need. The lowest is the best for better security because it decreases the risk of someone intercepting the token. So we recommend:
* One day for immediate usage.
* 25 days for cases of longer usage such as including the customer portal URL in an reminder that won't be opened immediately.
## Create custom fields
Refer to the Create Custom Field endpoint [here.](https://developer.upflow.io/#tag/custom-fields/post/custom_fields)
**Notes:**
* For creating/listing custom fields, use [`https://api.upflow.io/v1/custom_field`](https://api.upflow.io/v1/custom_field) API endpoint, GET/POST.
* For linking custom fields to customers, use [`https://api.upflow.io/v1/customer/`](https://api.upflow.io/v1/customer/) or use [`https://api.upflow.io/v1/customer/customerid`](https://api.upflow.io/v1/customer/) endpoint, POST/PUT.
* You will **not** be able to create a custom field via the Import Customer endpoint.
* Payment and Credit Note custom fields can be created through this endpoint using the "entityType": "CREDIT\_NOTE” or “PAYMENT”.
Values must be manually assigned on the UI.
* You can create custom fields with DATATYPE: **SELECT** or **MULTI\_SELECT** through this endpoint.
* The select values need not be specified on this request.
* Example Request Body:
\{ "externalId": "123", "label": "Select Custom Field", "description": "custom field description", "dataType": "SELECT", "entityType": "CUSTOMER" }
* The call should yield a *201 Created* status code when successful.
The custom field should now appear under the Customers entity (or the entity you indicate on the request) in your Settings > Custom Fields page.
* Once the custom field is created, you will be able to use the [Update Customer endpoint](https://developer.upflow.io/#tag/customers/put/customers/%7BcustomerId%7D) to both create the select value *and* assign that select value to the customer at the same time.
* Each time you use the API to input a new select value, a new selectable value is added to the dropdown for that custom field.
* **Important:** Values are case-sensitive so for example "One" and "one" will create two separate select values for the field.
* You can also both create a select value *and* assign that select value to a customer at the same time when creating a customer using the [Import Customer endpoint.](https://developer.upflow.io/#tag/customers/post/customers) (The only difference to the request is that this would be a POST request, the Upflow ID/external Id is omitted from the URL, and *name* & *externalId* of customer is required in the body in addition to the custom field array.)
The formatting for the body of the *PUT: Update Customer* request is shown below:
* For **SELECT** custom field:
\{ "customFields": \[ \{ "id": "12345", "externalId": "678910", "value": \{ "label": "One" } } ] }
(Note: You can exclude either the custom field id *or* external id from the body but not both.)
* For **MULTI\_SELECT** custom field:
\{ "customFields": \[ \{ "id": "12345", "externalId": "678910", "value": \[ \{ "label": "One" }, \{ "label": "Two" }] } ] }
(Note: You can exclude either the custom field id *or* external id from the body but not both.)
## Additional information
### Multi-organization handling
If you work with multiple Upflow organizations, you will need to generate a set of API keys for each organization and scope your synchronization logic to each.
***
If you have any questions/concerns, please submit a Support Request at the top of this article!