> ## Documentation Index
> Fetch the complete documentation index at: https://docs.upflow.io/llms.txt
> Use this file to discover all available pages before exploring further.
# ⚙️ Step 3 — Configure your settings
> Set up company identity, verify your email domain, configure replies import and aliases — the essential settings required to run collections in Upflow.
**Goal:** Configure the essential settings to run collections in Upflow.
⏱️ **Estimated time:** 1–2 hours
## Actions
* Configure company identity (logo, details, currency, communication timing)
* Verify your email domain
* Set up replies import and email alias
* Review and customize the customer portal
* Add custom fields for segmentation and workflow logic
* Decide which communication channels you will use
## Key decisions
* **Who owns your DNS setup?** Deliverability requires changes to your email domain. Identify your IT/Security/Ops contact before you start.
* **Will you send invoices from Upflow?** This changes how customers receive invoices and adds a Billing template to your workflows.
* **What custom fields do you need?** Define the customer attributes that will drive segmentation, routing, and reporting (e.g. customer tier, region, account owner, contract status) before you configure workflows.
* **Which channels will you use?** Calls and postal letters require additional setup. Decide upfront so you don't have to revisit this section later.
### Company — Required
Set your organization identity and defaults used across Upflow. These details appear anywhere Upflow shows your brand or generates customer-facing content — emails, the customer portal, and document outputs.
* Add your **logo**
* Fill in your **company details**
* Set your **default currency**
* Set the time **automatic communications** will be triggered
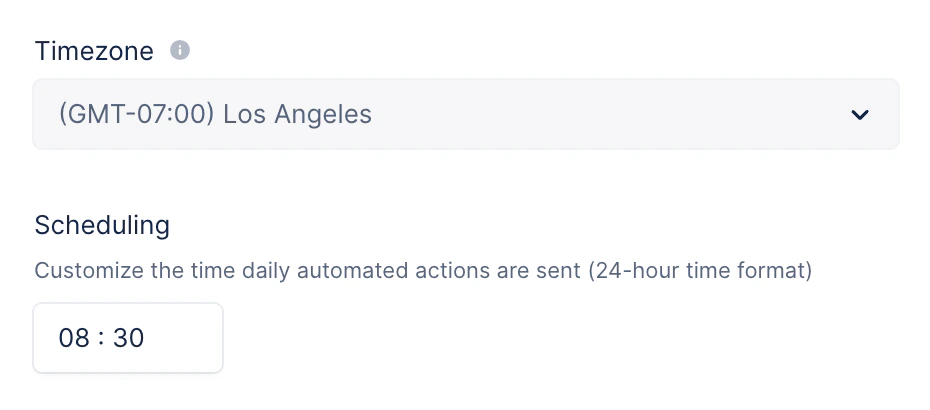 Learn more: [Sending automatic communications](https://docs.upflow.io/en-us/collection-and-collaboration/workflows-customize-your-collection/sending-automatic-actions#when-are-automatic-communications-sent)
### Deliverability — Required
Allow Upflow to send emails using your own domain. This is essential for your emails to land in your customers' inboxes and look like they're coming from you — not a third-party tool.
Add the required [**DNS records**](https://docs.upflow.io/en-us/collection-and-collaboration/emails/sending-emails-configure-your-domain) in your domain management tool (copy/paste values from Upflow), or connect your [**SMTP server**](https://docs.upflow.io/en-us/collection-and-collaboration/emails/connect-to-a-custom-smtp-server).
This step requires support from whoever manages your email domain (IT/Security/Ops). Start the conversation early — this is the most common reason onboarding gets delayed.
Learn more: [Sending emails](https://docs.upflow.io/en-us/collection-and-collaboration/emails/sending-emails)
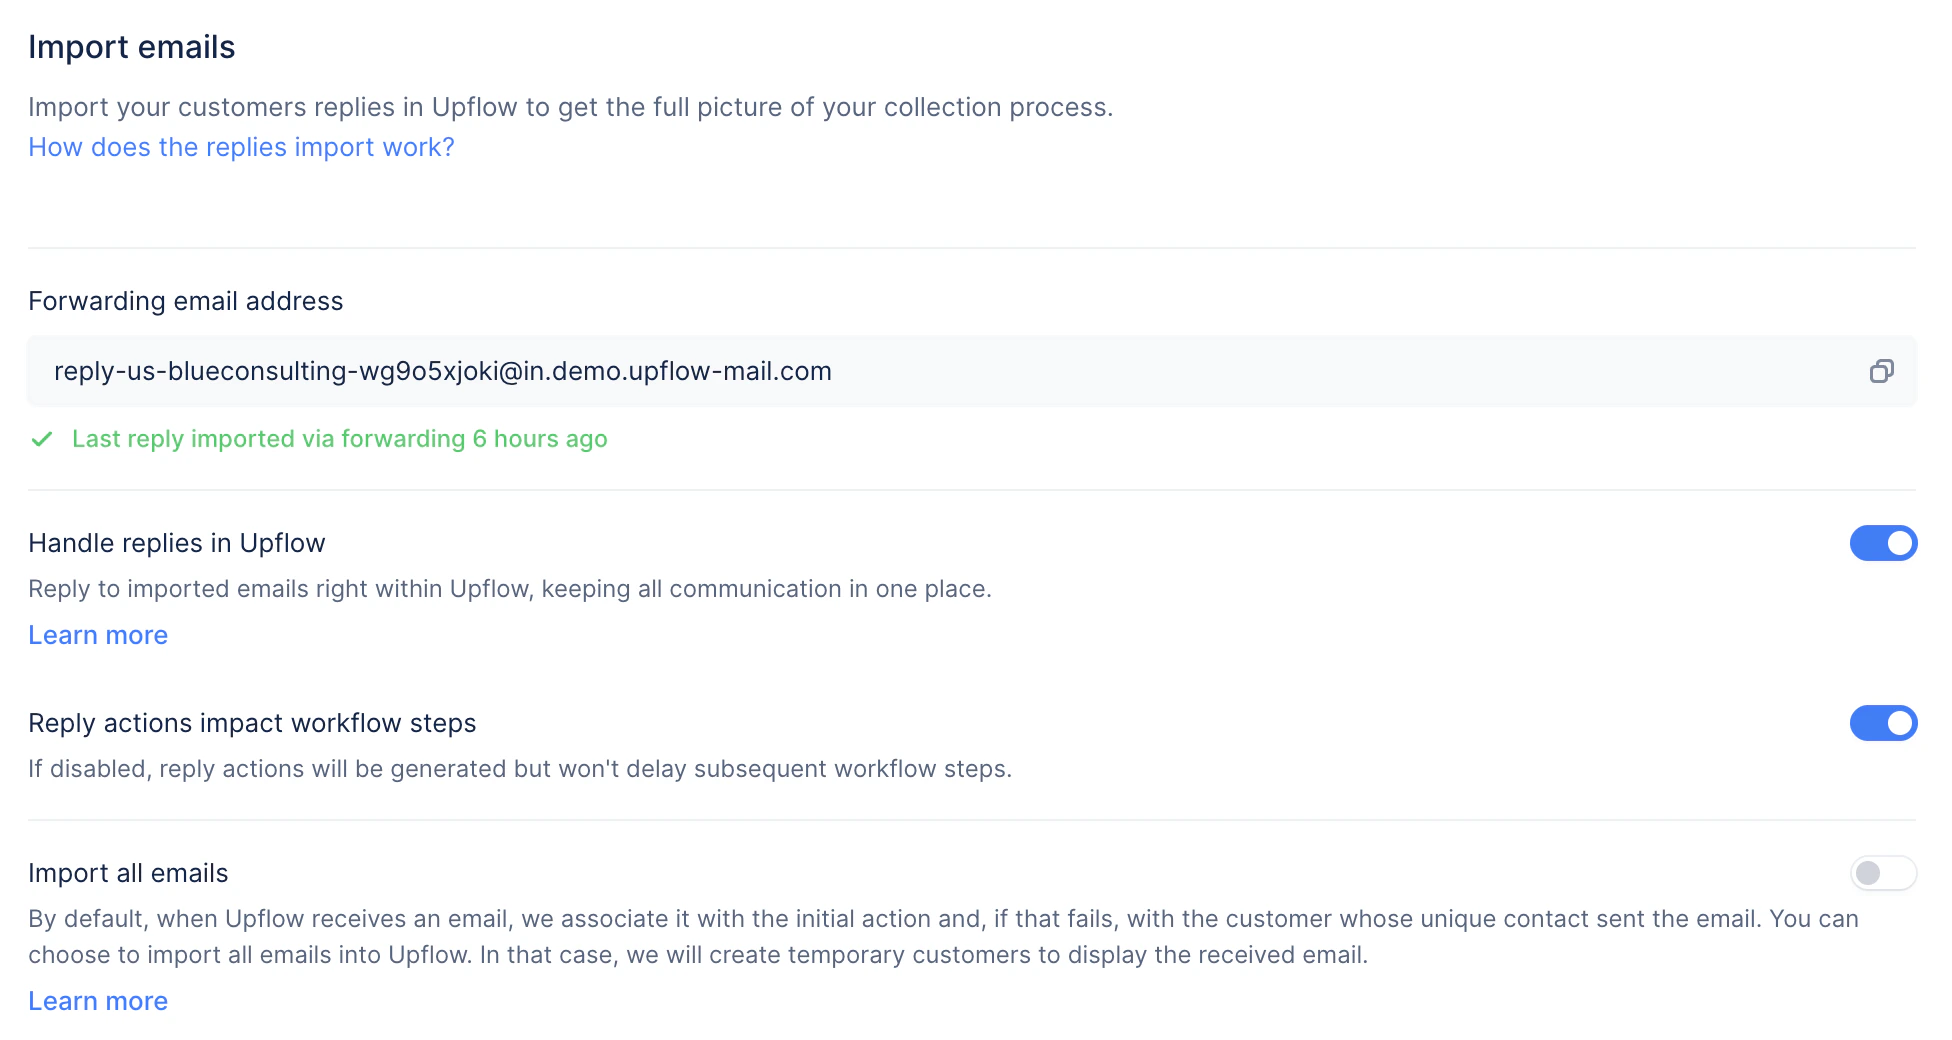
### Import emails and aliases — Required
**Email import** captures customer replies directly in Upflow so your whole team has a shared, end-to-end view of every conversation — no more digging through individual inboxes.
Use [Import your customers' replies automatically](https://docs.upflow.io/en-us/collection-and-collaboration/emails/import-your-customers-replies-automatically#import-your-customers-replies-automatically) to route replies into Upflow. If you use Gmail, the [Gmail integration](https://docs.upflow.io/en-us/collection-and-collaboration/emails/gmail-email-import-beta#import-customer-emails-automatically-with-gmail-integration-beta) is the easiest way to get set up.
Learn more: [Sending automatic communications](https://docs.upflow.io/en-us/collection-and-collaboration/workflows-customize-your-collection/sending-automatic-actions#when-are-automatic-communications-sent)
### Deliverability — Required
Allow Upflow to send emails using your own domain. This is essential for your emails to land in your customers' inboxes and look like they're coming from you — not a third-party tool.
Add the required [**DNS records**](https://docs.upflow.io/en-us/collection-and-collaboration/emails/sending-emails-configure-your-domain) in your domain management tool (copy/paste values from Upflow), or connect your [**SMTP server**](https://docs.upflow.io/en-us/collection-and-collaboration/emails/connect-to-a-custom-smtp-server).
This step requires support from whoever manages your email domain (IT/Security/Ops). Start the conversation early — this is the most common reason onboarding gets delayed.
Learn more: [Sending emails](https://docs.upflow.io/en-us/collection-and-collaboration/emails/sending-emails)
### Import emails and aliases — Required
**Email import** captures customer replies directly in Upflow so your whole team has a shared, end-to-end view of every conversation — no more digging through individual inboxes.
Use [Import your customers' replies automatically](https://docs.upflow.io/en-us/collection-and-collaboration/emails/import-your-customers-replies-automatically#import-your-customers-replies-automatically) to route replies into Upflow. If you use Gmail, the [Gmail integration](https://docs.upflow.io/en-us/collection-and-collaboration/emails/gmail-email-import-beta#import-customer-emails-automatically-with-gmail-integration-beta) is the easiest way to get set up.
 **Aliases** let teammates send from shared addresses (e.g. finance@, collections@, legal@) while keeping all activity tracked in Upflow. Add a signature so emails look like they're genuinely coming from your team.
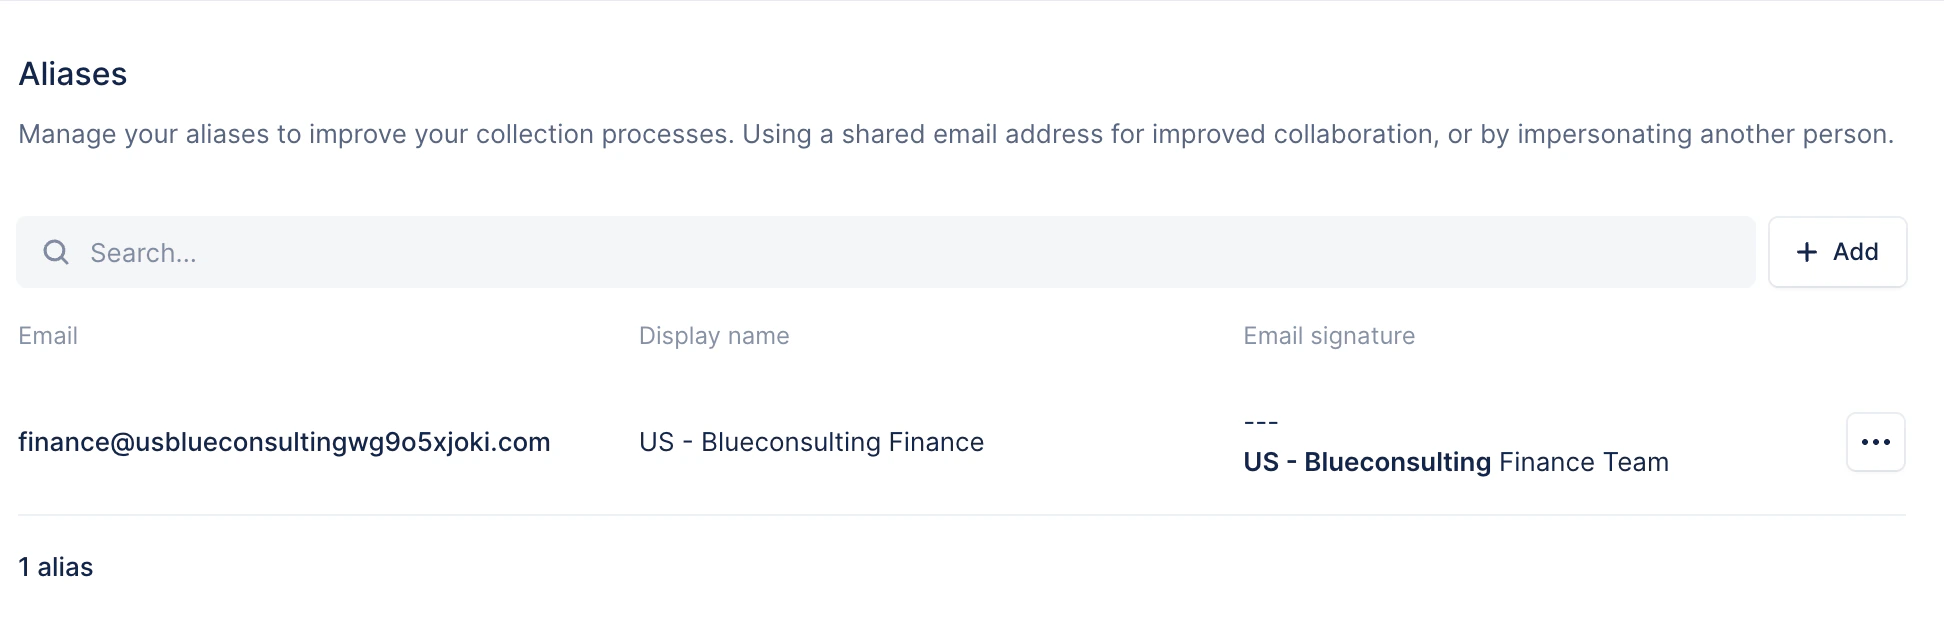 Learn more: [Aliases](https://docs.upflow.io/en-us/collection-and-collaboration/workflows-customize-your-collection/aliases#aliases)
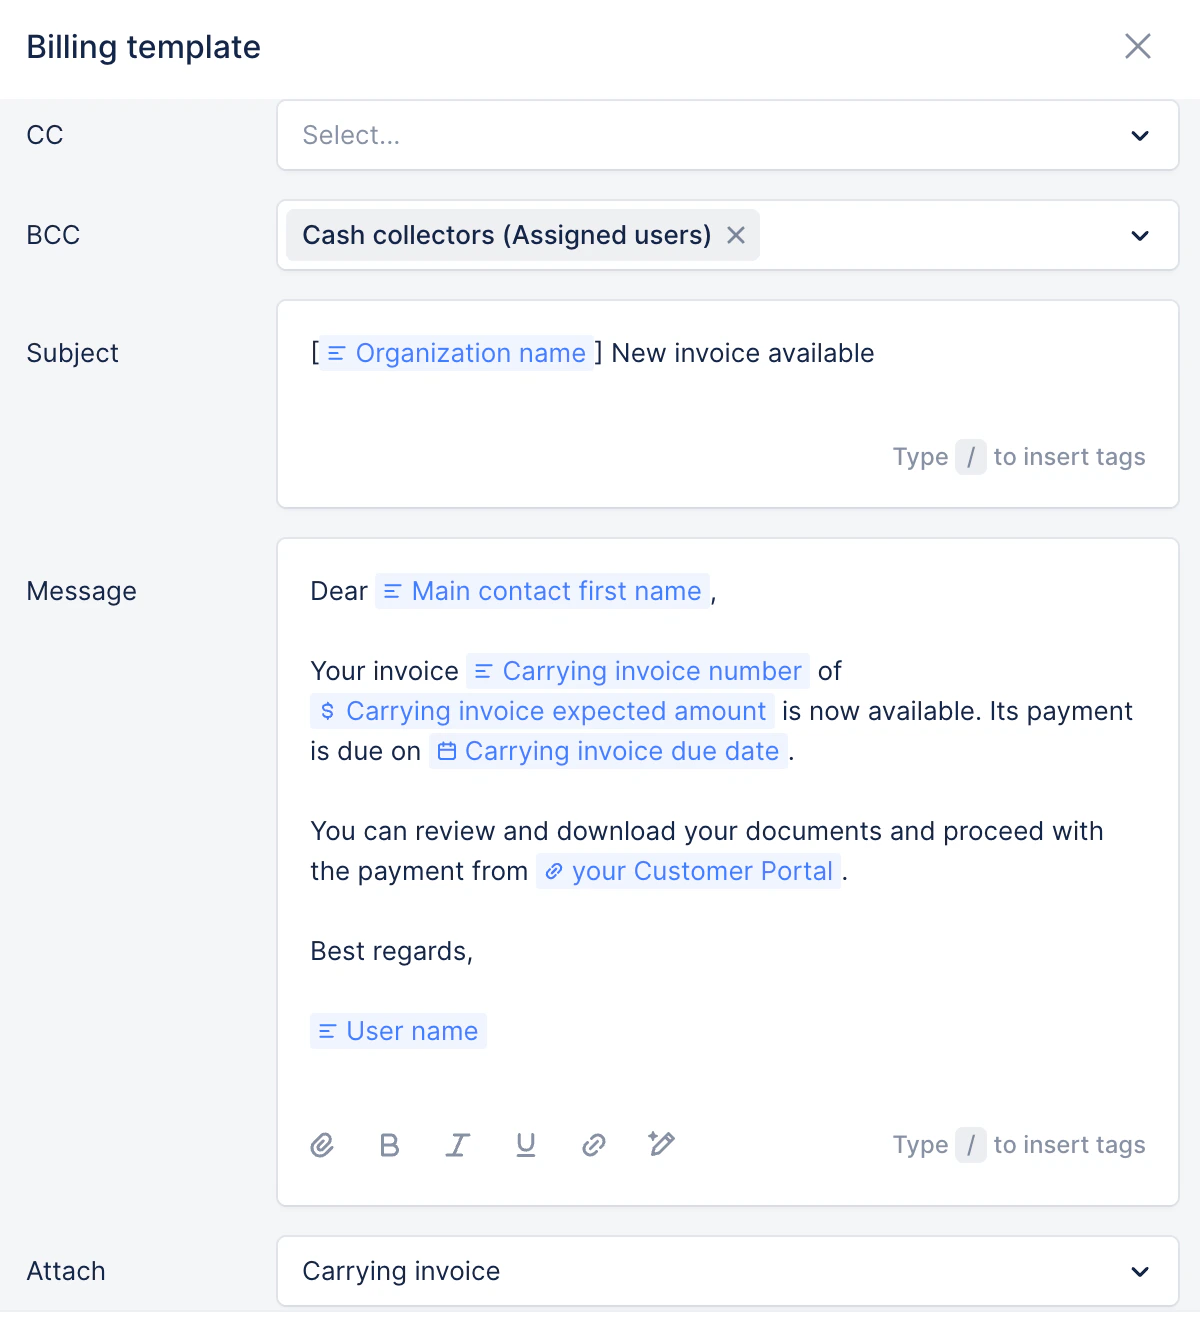
### Invoicing — Recommended
Enable [sending invoices from Upflow](https://docs.upflow.io/en-us/collection-and-collaboration/send-invoices-from-upflow/overview#send-invoices-from-upflow) to manage all invoicing and collections communications from one place. Once enabled, a **Billing template** will appear in your customer-level workflows — this is the message customers receive every time a new invoice is available.
Learn more: [Aliases](https://docs.upflow.io/en-us/collection-and-collaboration/workflows-customize-your-collection/aliases#aliases)
### Invoicing — Recommended
Enable [sending invoices from Upflow](https://docs.upflow.io/en-us/collection-and-collaboration/send-invoices-from-upflow/overview#send-invoices-from-upflow) to manage all invoicing and collections communications from one place. Once enabled, a **Billing template** will appear in your customer-level workflows — this is the message customers receive every time a new invoice is available.
 While in test mode, you'll need to manually mark invoices as sent. Once you go live, you can manage these from your To Do list. The guide below shows how:
You can also enable [payment receipts](https://docs.upflow.io/en-us/collection-and-collaboration/run-your-collection/sending-payment-receipts-to-your-customers#sending-payment-receipts-to-your-customers) to be sent automatically to customers after payment is confirmed.
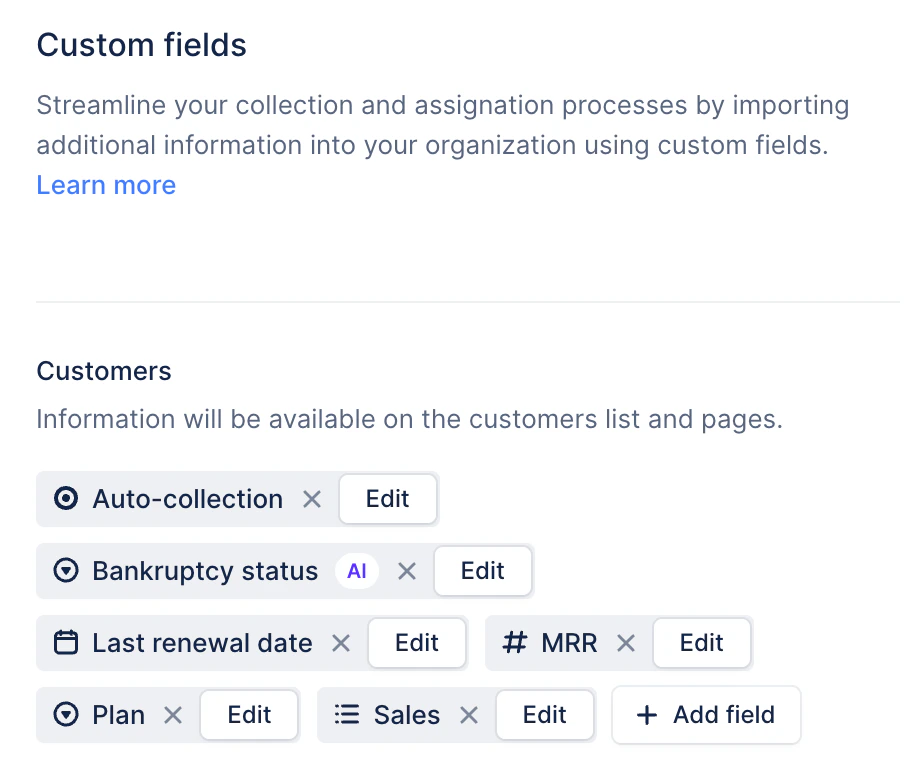
### Custom fields — Recommended
[Import and create custom fields](https://docs.upflow.io/en-us/core-entities/others/import-and-create-custom-fields-into-upflow#import-and-create-custom-fields-into-upflow) to keep important customer context structured, filterable, and reportable — rather than buried in notes.
Common examples: **Customer tier, Account owner, Contract status, Region, Collection strategy**
Define these before configuring workflows in Step 5 — your workflow segmentation will depend on them.
 ### Customer portal — Recommended
Customize your [customer portal](https://docs.upflow.io/en-us/customer-portal/customer-portal/overview) so it reflects your brand and gives customers access to the right features — invoices, dispute submission, payment options.
### Customer portal — Recommended
Customize your [customer portal](https://docs.upflow.io/en-us/customer-portal/customer-portal/overview) so it reflects your brand and gives customers access to the right features — invoices, dispute submission, payment options.
 *Some portal customizations depend on your plan.*
### Calls — Recommended
Enable [calls](https://docs.upflow.io/en-us/collection-and-collaboration/live-calls/live-calls-from-upflow#live-calls-from-upflow) to use Upflow as your outbound dialer. Call recordings and transcripts are tied to the customer record, so your whole team has visibility into follow-up activity.
### Letters — Recommended
Add a **letter footer** (company/legal info, return contact details) to enable [postal reminders](https://docs.upflow.io/en-us/collection-and-collaboration/letters/send-postal-reminders#send-postal-reminders-from-upflow). Every letter will automatically include your legal entity information and the right contact details.
### Security — Recommended
Enable [Google SSO](https://docs.upflow.io/en-us/technical-documentation/sso/enforce-sign-in-with-google) directly from your Security settings. For other SSO authentication types, follow the instructions [here](https://docs.upflow.io/en-us/technical-documentation/sso/enabling-single-sign-on-sso-for-your-upflow-users).
### Excluded customers — Recommended
[Exclude](https://docs.upflow.io/en-us/core-entities/customers/exclude-customers#exclude-customers-from-upflow) any customers who should not be visible in Upflow. When a customer is excluded, their data will not be available and will impact your reporting and collections, so we recommend only excluding test or intercompany customers.
If there are customers you do not wish to contact via Upflow but still need visibility of, you can assign them to an empty workflow instead.
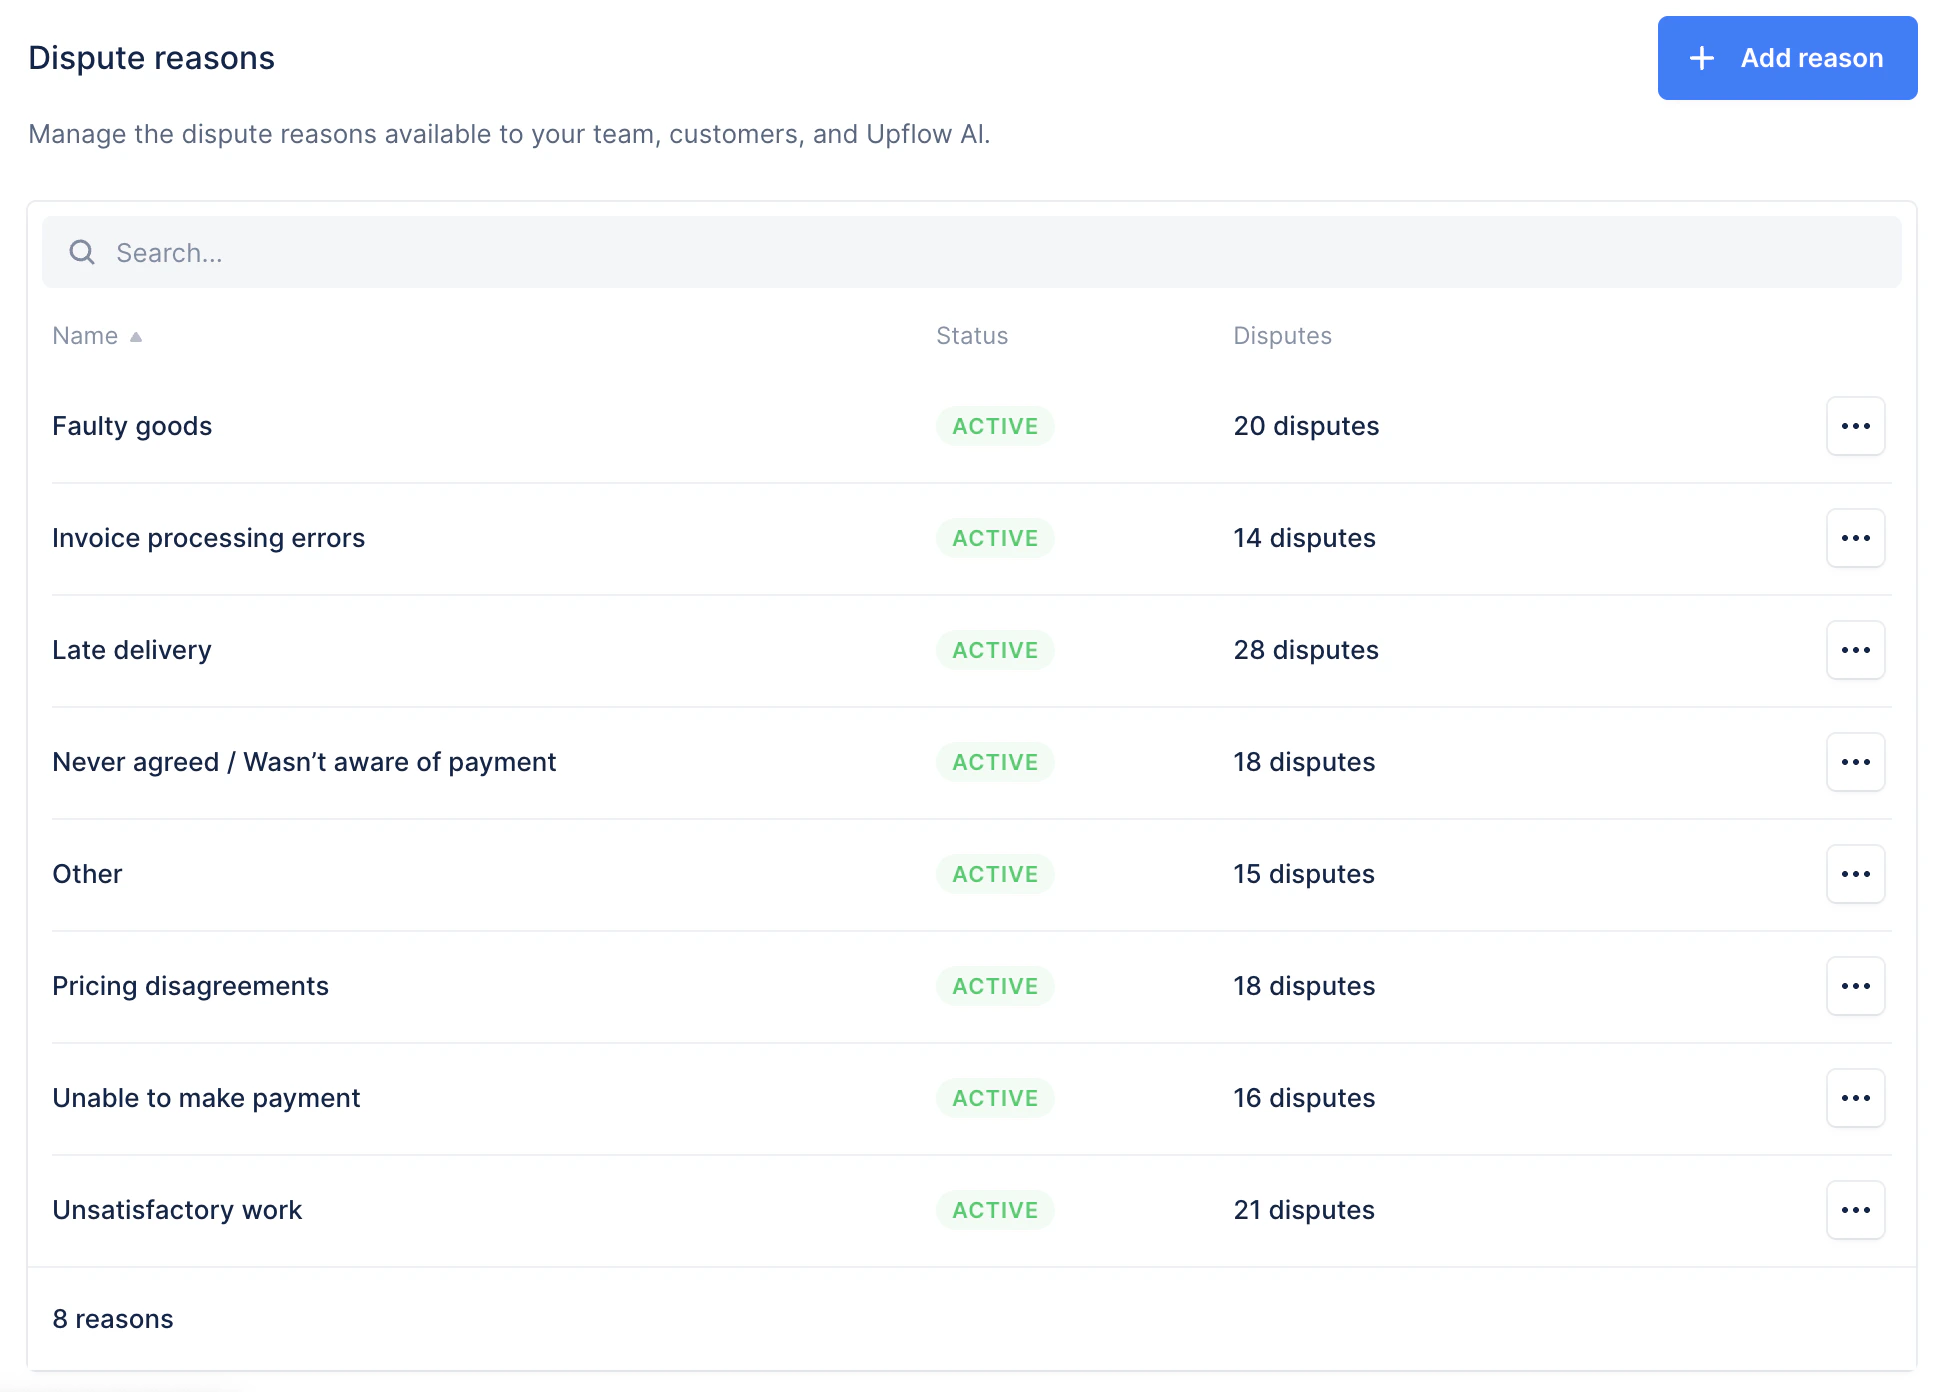
### Dispute reasons — Optional
Manage the list of [invoice dispute reasons](https://docs.upflow.io/en-us/core-entities/invoices/invoice-dispute-reasons#invoice-dispute-reasons) available to your team and to customers via the portal. Keeping this list relevant to your business makes disputes easier to categorize and report on.
*Some portal customizations depend on your plan.*
### Calls — Recommended
Enable [calls](https://docs.upflow.io/en-us/collection-and-collaboration/live-calls/live-calls-from-upflow#live-calls-from-upflow) to use Upflow as your outbound dialer. Call recordings and transcripts are tied to the customer record, so your whole team has visibility into follow-up activity.
### Letters — Recommended
Add a **letter footer** (company/legal info, return contact details) to enable [postal reminders](https://docs.upflow.io/en-us/collection-and-collaboration/letters/send-postal-reminders#send-postal-reminders-from-upflow). Every letter will automatically include your legal entity information and the right contact details.
### Security — Recommended
Enable [Google SSO](https://docs.upflow.io/en-us/technical-documentation/sso/enforce-sign-in-with-google) directly from your Security settings. For other SSO authentication types, follow the instructions [here](https://docs.upflow.io/en-us/technical-documentation/sso/enabling-single-sign-on-sso-for-your-upflow-users).
### Excluded customers — Recommended
[Exclude](https://docs.upflow.io/en-us/core-entities/customers/exclude-customers#exclude-customers-from-upflow) any customers who should not be visible in Upflow. When a customer is excluded, their data will not be available and will impact your reporting and collections, so we recommend only excluding test or intercompany customers.
If there are customers you do not wish to contact via Upflow but still need visibility of, you can assign them to an empty workflow instead.
### Dispute reasons — Optional
Manage the list of [invoice dispute reasons](https://docs.upflow.io/en-us/core-entities/invoices/invoice-dispute-reasons#invoice-dispute-reasons) available to your team and to customers via the portal. Keeping this list relevant to your business makes disputes easier to categorize and report on.
 ## ✅ Validation
* Logo is visible in Upflow
* Domain is verified
* Alias is set up for sending emails
* Custom fields are added for better segmentation and analysis
👉 Next: [**Step 4 — Collect online payments**](/en-us/essentials/get-started/step-4-collect-online-payments)
## ✅ Validation
* Logo is visible in Upflow
* Domain is verified
* Alias is set up for sending emails
* Custom fields are added for better segmentation and analysis
👉 Next: [**Step 4 — Collect online payments**](/en-us/essentials/get-started/step-4-collect-online-payments)